Active Directory Pentesting — Part 1: Environment Setup
First installment of the Active Directory pentesting series. A lab is built from scratch with VirtualBox, a domain controller is deployed, users are created and vulnerable configurations are seeded to practice attacks.
Active Directory is, still today, the heart of the vast majority of corporate networks: the system that decides who you are, what you can access and under which conditions within an organization. And precisely because it is so central, it is one of the favorite targets of any attacker. Compromising the domain usually means compromising everything.
The best way to understand how an Active Directory environment is attacked —and, above all, how it is defended— is not reading about it, but building one with your own hands and breaking it in a controlled space. That is exactly what this series will do: build a realistic lab, deliberately seed it with bad configurations and, in later installments, exploit them step by step as a Red Team would.
This first post focuses on the foundations: setting up the environment. By the end there will be a working domain with a domain controller, client machines joined to it and a set of vulnerable configurations ready for the attacks to come.
Everything described here is performed in an isolated lab that you own. Reproducing these techniques against third-party systems without explicit authorization is illegal. The purpose is exclusively educational and defensive.
Series objectives and scope
Before starting, it is worth setting out the full map of the journey. Throughout this series the following will be covered:
- Design, creation and deployment of an Active Directory lab environment with virtual machines to run security tests and attack simulations.
- Enumeration of users and resources with PowerShell.
- Execution of techniques such as ASREP-Roasting, Kerberoasting, user impersonation, Pass-the-Hash (PtH) and Pass-the-Ticket (PtT) to assess the security of credentials and authentication.
- Lateral movement and privilege escalation within the domain through post-exploitation techniques.
- Documentation of vulnerabilities and attack scenarios, including evidence, impact and mitigation recommendations.
The technologies used throughout the different installments are: PowerShell, Rubeus, Impacket, mimikatz, Metasploit, Meterpreter and msfvenom, among others.
The scope of this post is the lab setup from start to finish: from preparing the virtual machines to the first successful domain user logon, including the deployment of Active Directory, the configuration of the domain controller and the creation of the objects (users, groups, GPOs and attributes) that will serve as the attack surface in the following chapters.
Recommended prior knowledge
Being an expert is not necessary to follow this first part, but some basic notions will help:
- TCP/IP networking fundamentals (IP addressing, DNS, gateways).
- Minimal proficiency administering Windows systems (Server and client).
- What a domain controller is and what it is for, at a conceptual level.
- Familiarity with the virtualization software (in this case, VirtualBox) and prior experience creating virtual machines.
If any of these points is unfamiliar, there is no need to worry: the key concepts are explained along the way.
The environment
The environment used for this practice consists mainly of the following virtual machines and relies on VirtualBox as the virtualization software.
- Windows Server 2019 — DC01 — IP:
10.0.2.14 - Windows 10 Enterprise — Client — IP:
10.0.2.0/24 - Kali Linux (attacker) — IP:
10.0.2.9
In simple terms: there will be a server acting as the “boss” of the network (the domain controller), a client machine that will be a typical corporate computer joined to that domain, and an attacker machine (Kali Linux) from which the offensives will be launched in upcoming installments. All of them are on the same network segment.
Creating the Active Directory lab
Windows Server 2019
Some steps of the lab creation, such as the virtual machine configuration, are deliberately omitted because they are considered easy and something that should already be known before undertaking this kind of project: the process is practically the same regardless of the virtualization software or the machine being created (name, memory, disk, network and the boot ISO). For the same reason, the installation of Windows Server 2019 is omitted, as it consists of following the wizard’s instructions and clicking “Next” until it finishes.
Once the virtual machine is configured and the Windows Server 2019 operating system is installed, this machine will be called DC01 and the Active Directory infrastructure will be deployed on it.
The first step is to change the server’s default name to DC01 to avoid future problems.
In the Server Manager administrator console, click the Computer name property to change the server name.
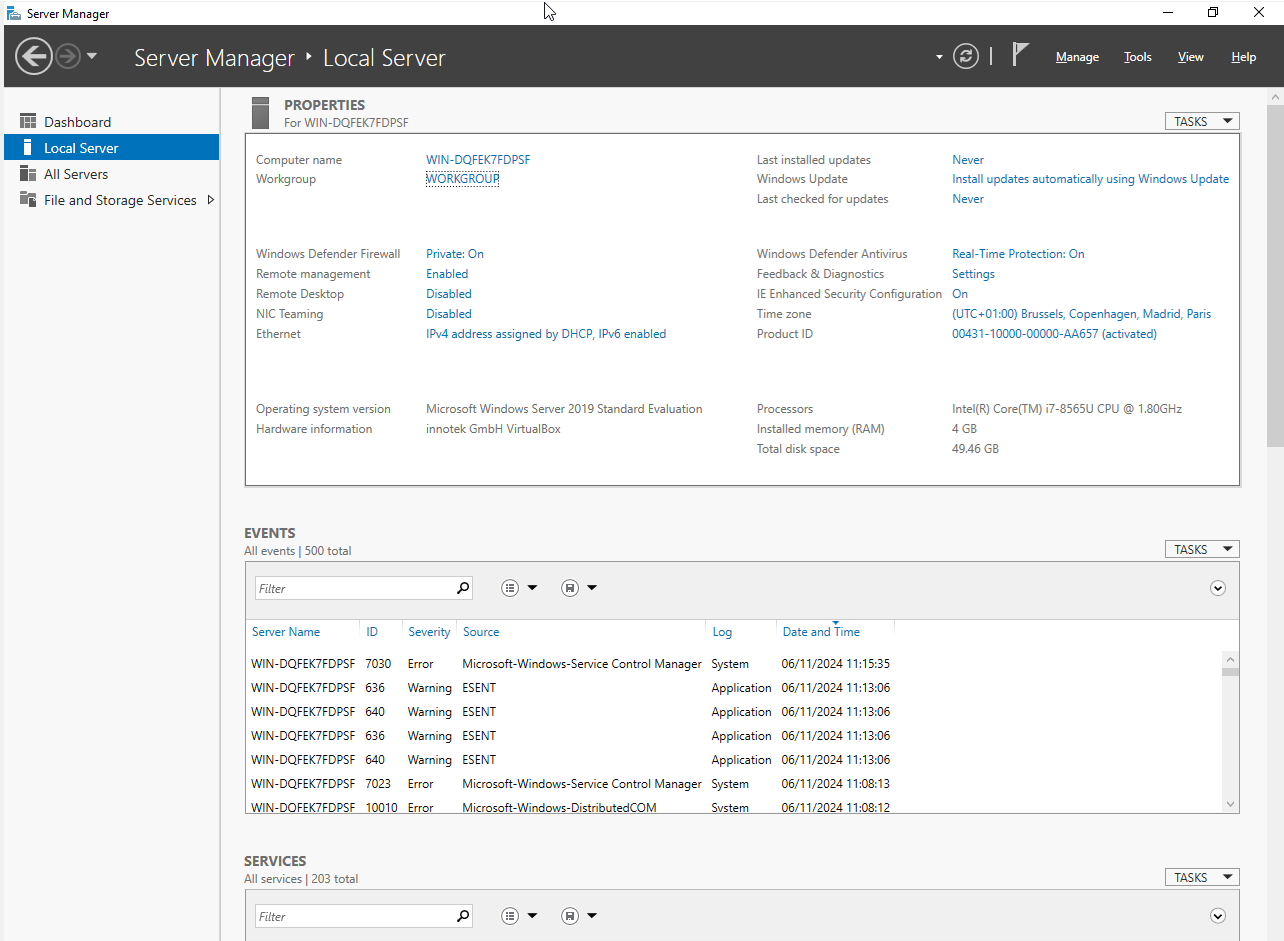 Figure 1. Initial Windows Server 2019 administration dashboard.
Click the “Change” button.
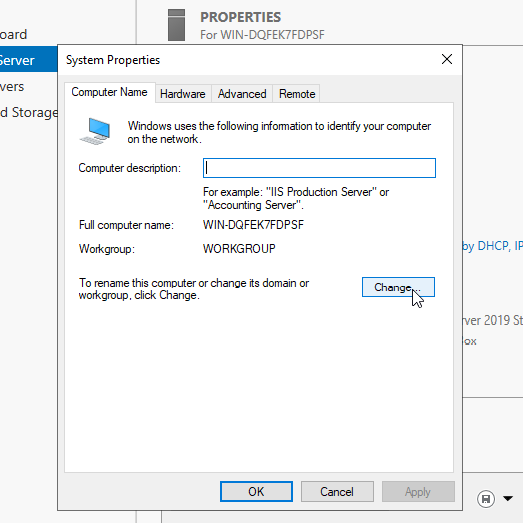 Figure 2. System properties menu.
Change the name and press OK.
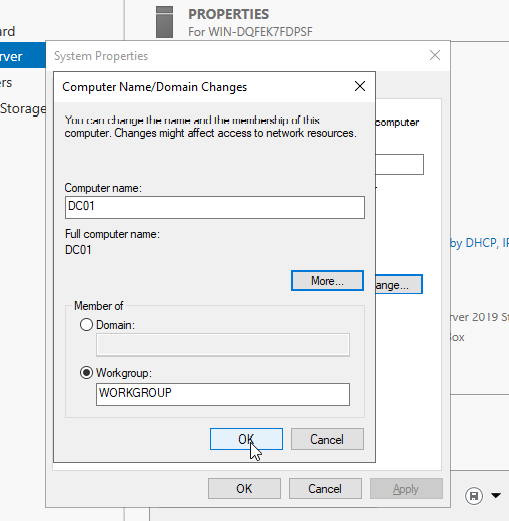 Figure 3. Server name change.
After changing the server name, the system asks for a restart for the changes to take effect.
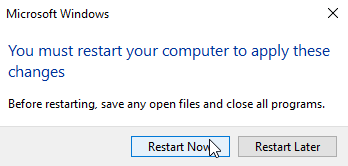 Figure 4. Device restart menu.
After rebooting, the changes are in effect.
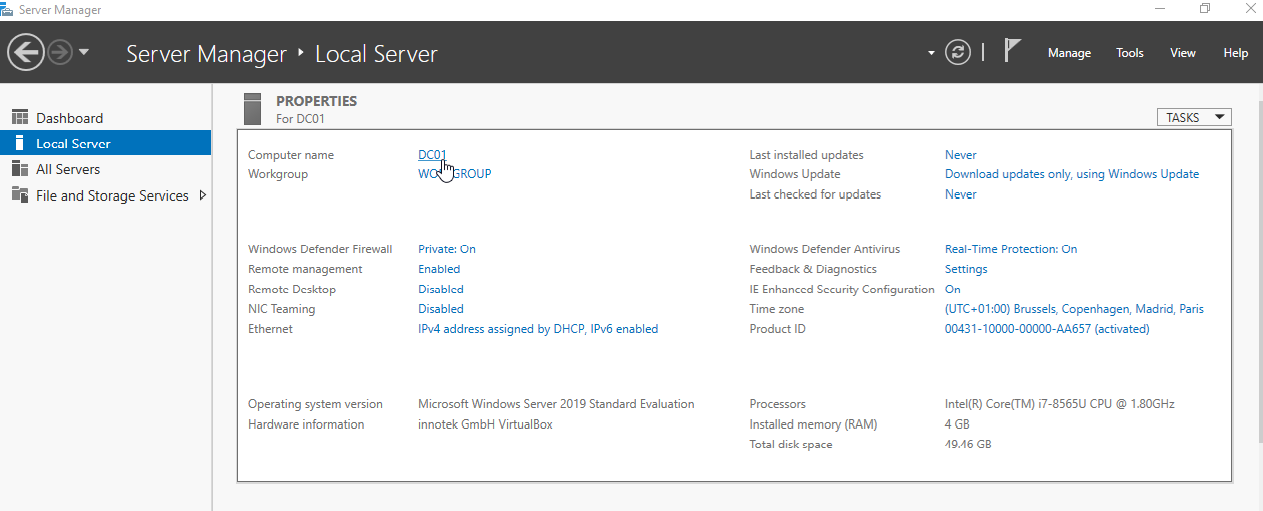 Figure 5. Server name successfully changed.
Additionally, it is advisable to configure the network address of the server that will act as the domain controller so that it has a static IP. This way, the rest of the machines joining the domain will always know which machine is the domain controller and the DNS service.
Click on the Ethernet section and then on the Properties button.
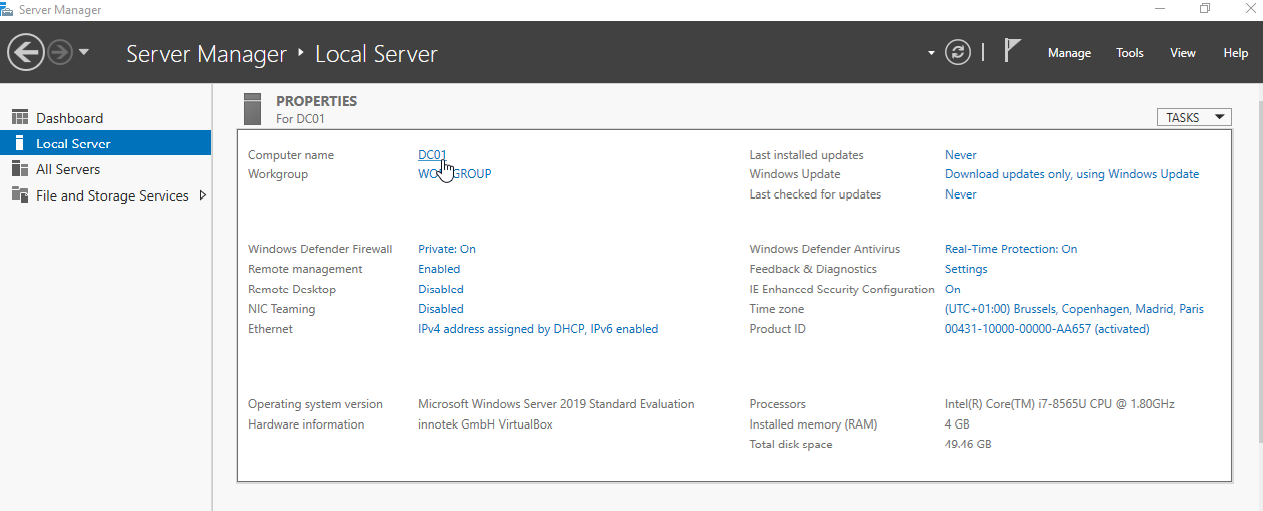 Figure 6. IP change on the server.
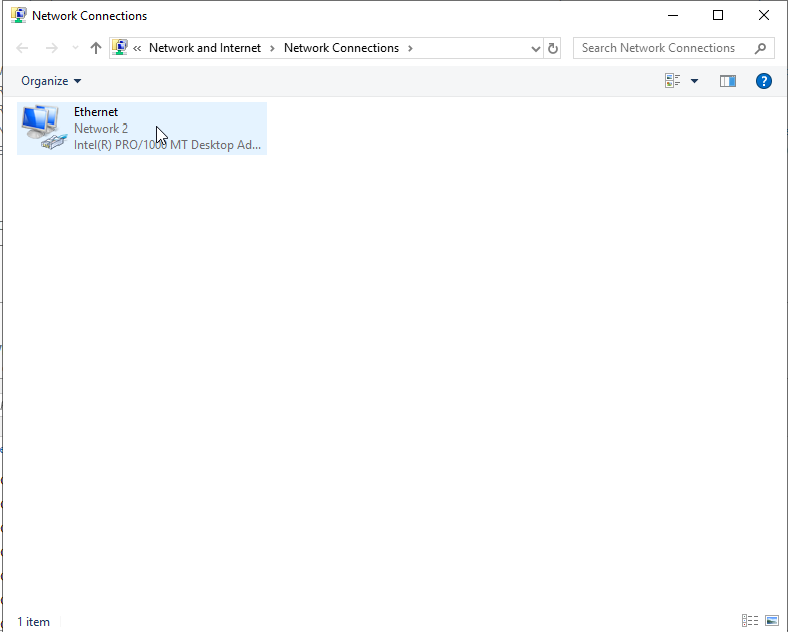 Figure 7. Network connections menu.
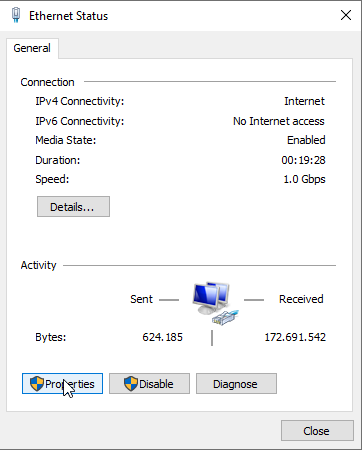 Figure 8. Network status menu.
In the properties, select TCP/IPv4 and configure the IP address and the DNS service.
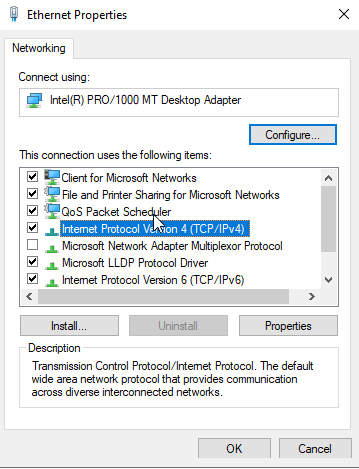 Figure 9. IP address change menu.
In this case, as it is the server that will act as the domain controller, the DNS it will use is its own.
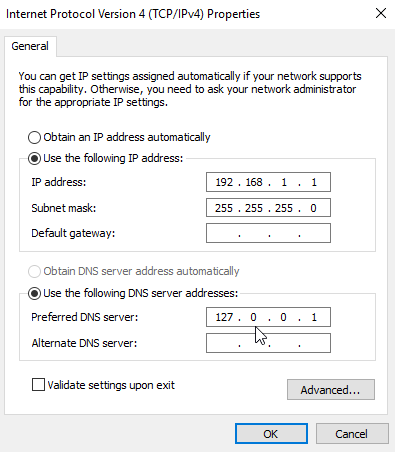 Figure 10. Network configuration update.
The changes can be seen to have been applied correctly.
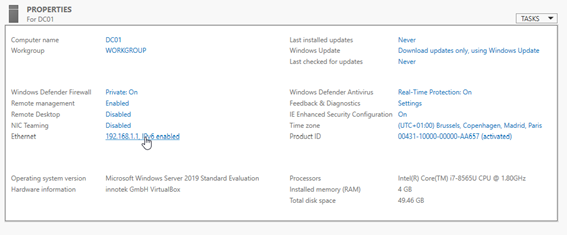 Figure 11. Server administration dashboard with updated network changes.
When adding new machines to the domain, they must have the IP of the configured domain controller set as their Gateway and DNS service.
Completely disabling the Firewall
To disable the Windows system firewall protections, open the “Windows Security” program and, within it, “Firewall”.
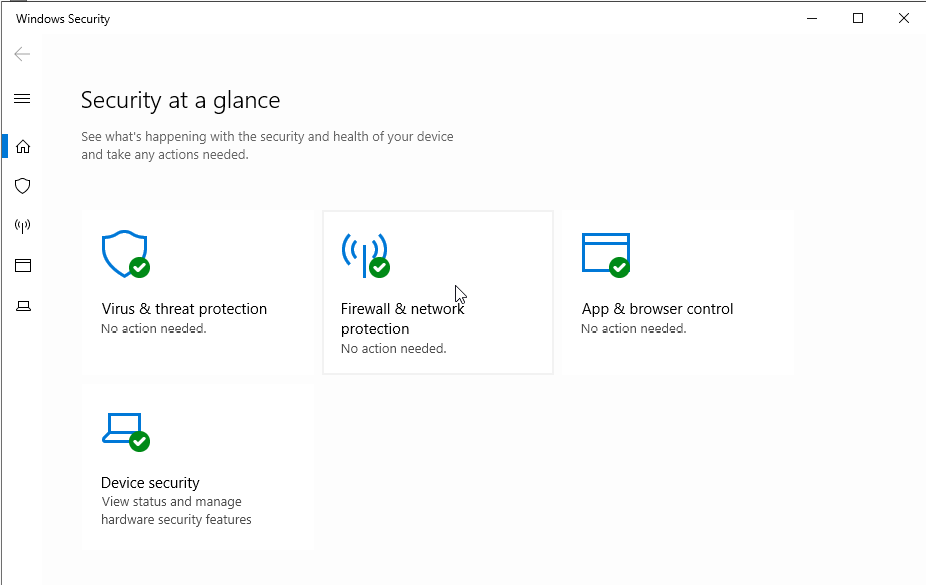 Figure 12. Windows Security Firewall.
Once there, disable the firewalls of the different networks (domain, private and public).
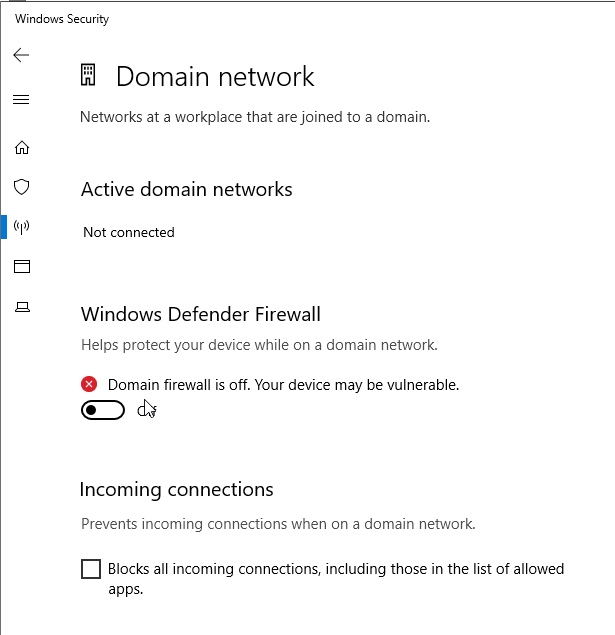 Figure 13. Disabling the domain network firewall.
Finally, verify that all firewall protections have been disabled.
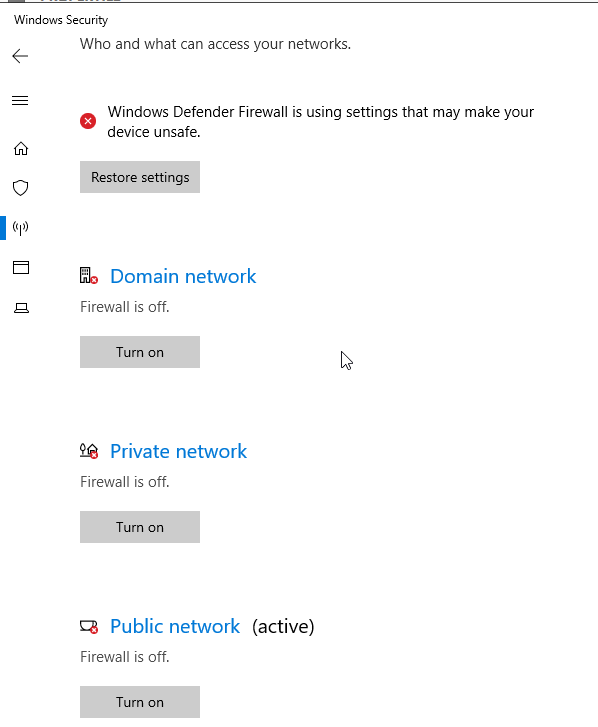 Figure 14. List of disabled firewalls.
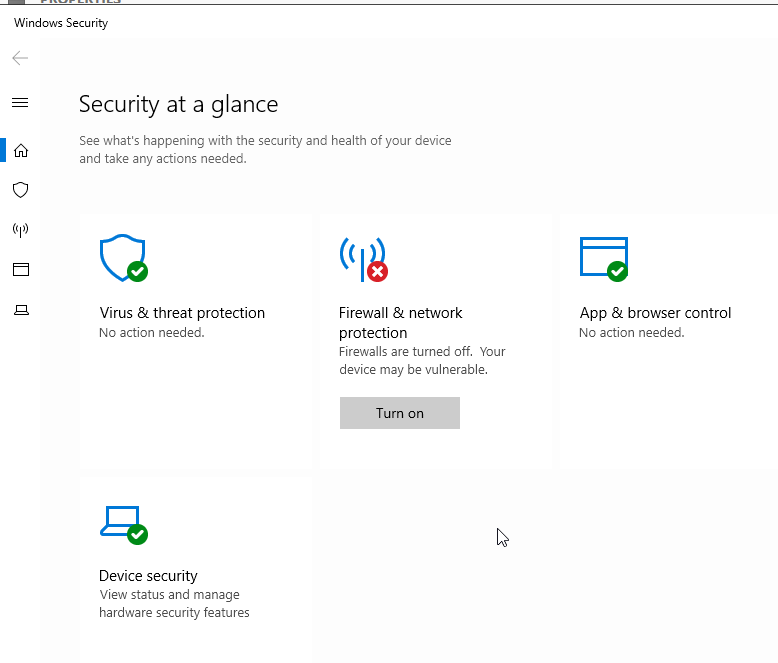 Figure 15. List of disabled firewalls.
Completely disabling the firewall is, obviously, terrible security practice. It is done here on purpose so that the lab does not interfere with the attacks to be studied later. Never do this in a real environment.
Windows 10 — Client
As with the Windows Server 2019 installation, the creation of the virtual machine and the installation of the operating system are also omitted in this part, since it is considered a simple process of little relevance to the post as a whole.
Therefore, once the Client machine is correctly installed, the default name given to the computer is changed to Client.
To do so, search for the “View your PC name” option, then press the “Rename PC” button and enter the new name.
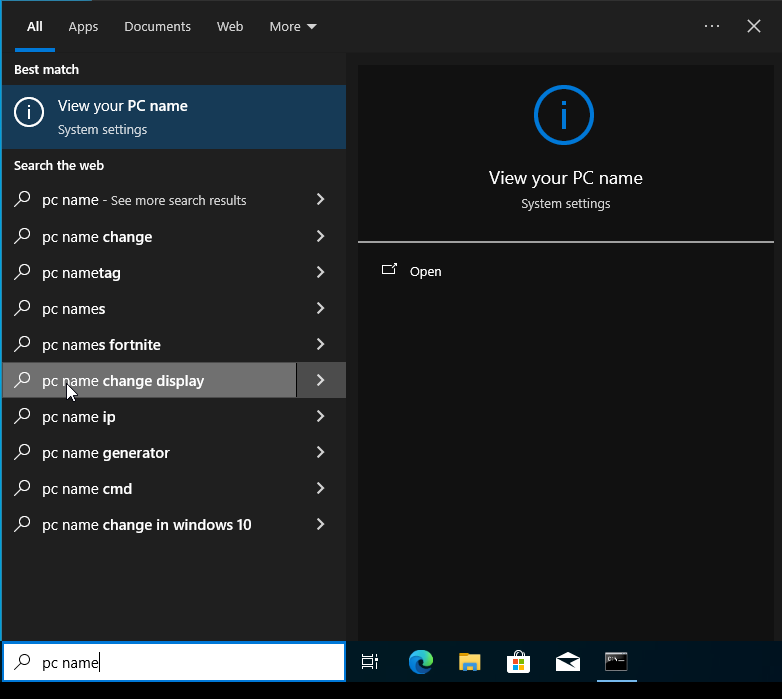 Figure 16. View PC name option.
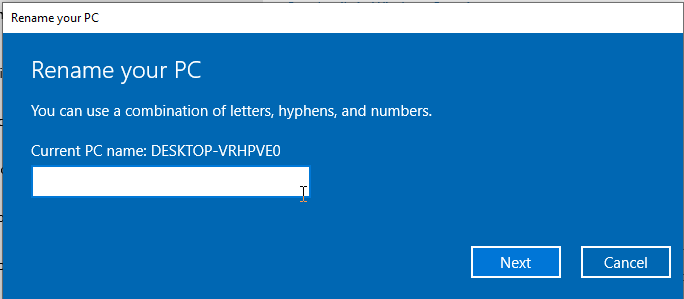 Figure 17. Changing the PC name to Client.
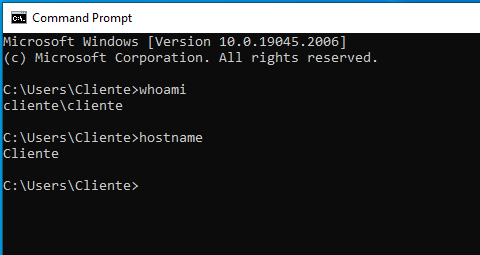 Figure 18. PC name successfully changed.
Completely disabling the Firewall
To disable the Firewall on the Windows 10 Client machine, the same steps as with Windows Server 2019 are followed until every firewall option is disabled.
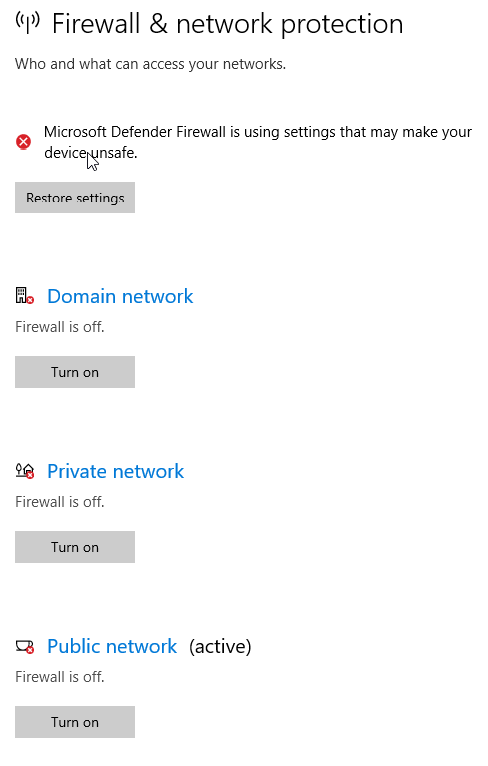 Figure 19. Disabling the Windows 10 firewall.
Deploying Active Directory
To deploy an Active Directory structure at least one domain controller is needed. For this, the domain controller (DC) role is assigned to the installed server.
The first step is to install the Active Directory roles and features on the server. Click the Manage option in the top-right corner and then “Add Roles and Features”.
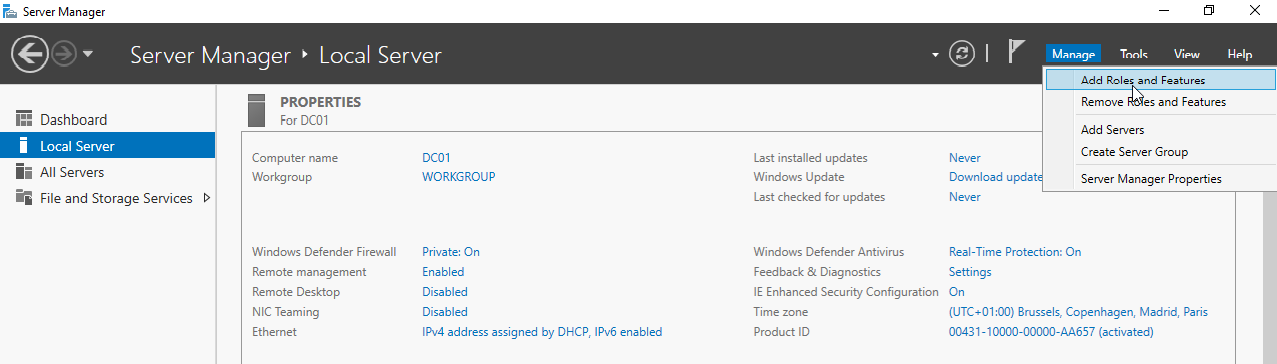 Figure 20. Roles and features installation menu in Windows Server (1).
Configure the options in the wizard that appears.
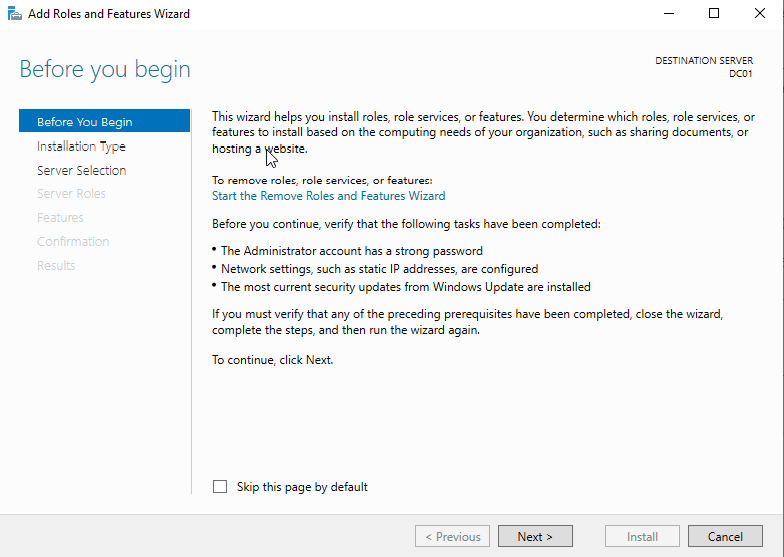 Figure 21. Roles and features installation menu in Windows Server (2).
As the installation type, select the “Role-based or feature-based installation” option.
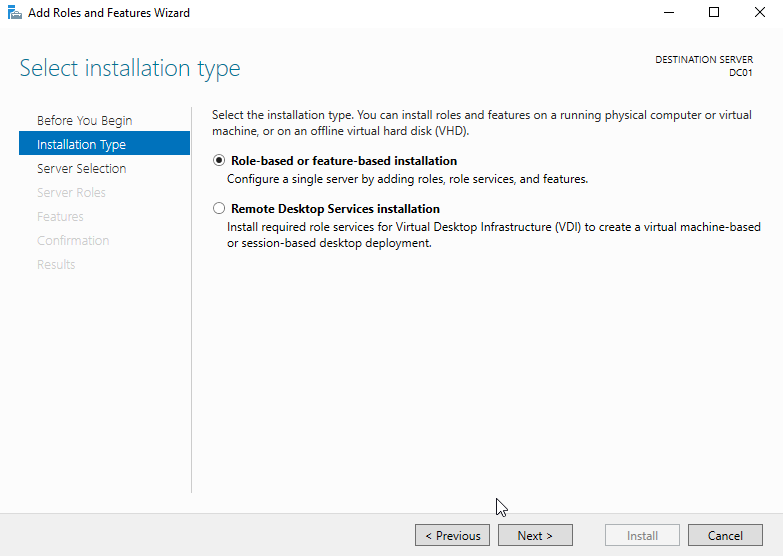 Figure 22. Installation type selection.
Next, select the server where the roles and features will be installed and click Next.
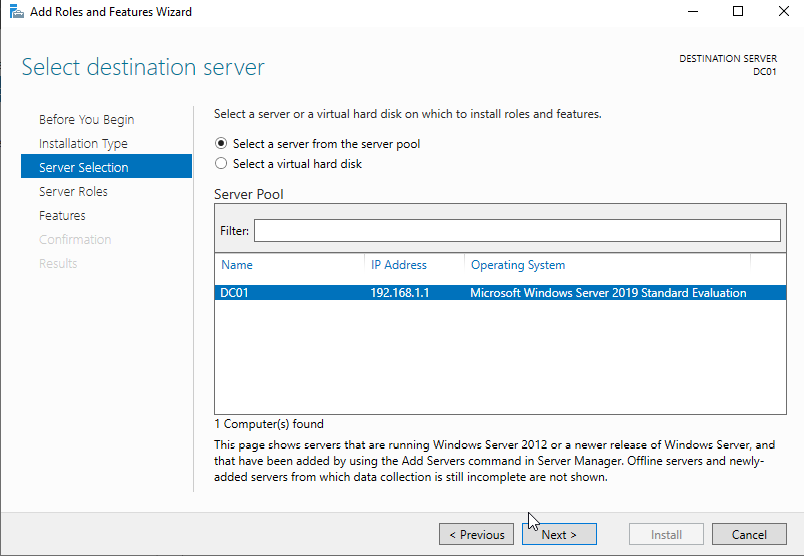 Figure 23. Installation server selection.
Select the “Active Directory Domain Services” role and click Next.
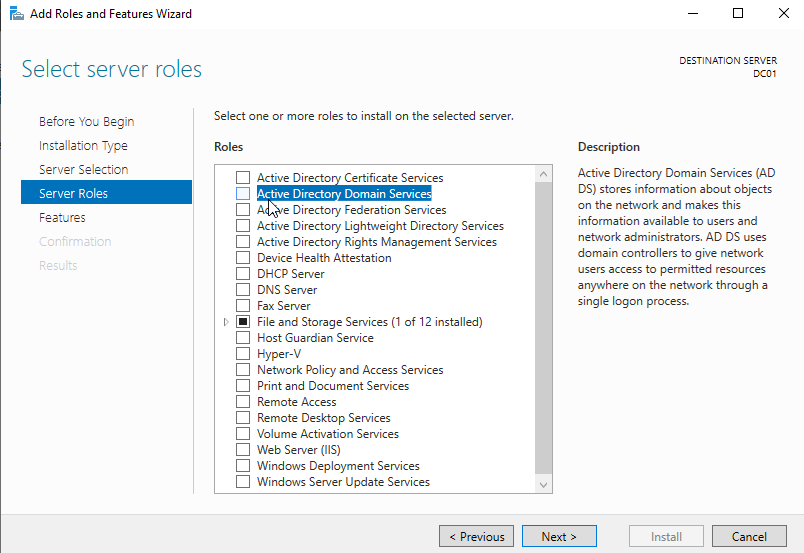 Figure 24. Selection of the role to install.
Add the features.
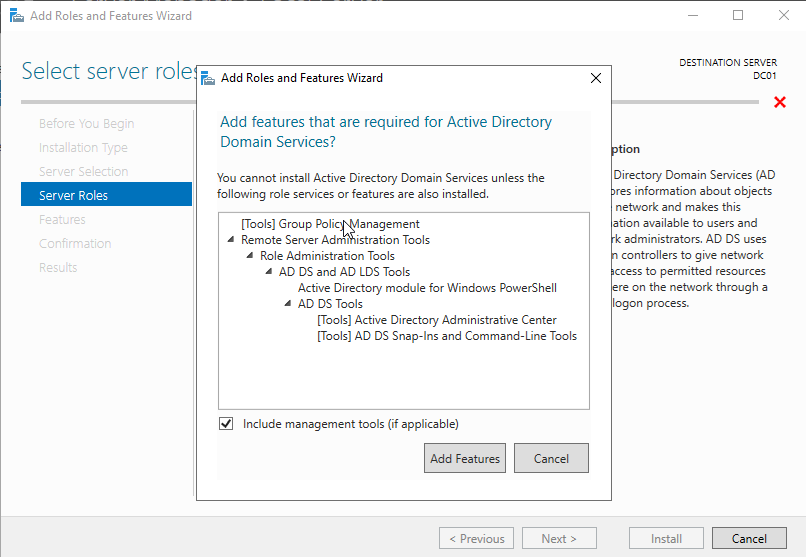 Figure 25. Adding the role features.
In the following screens simply leave the default options and click next.
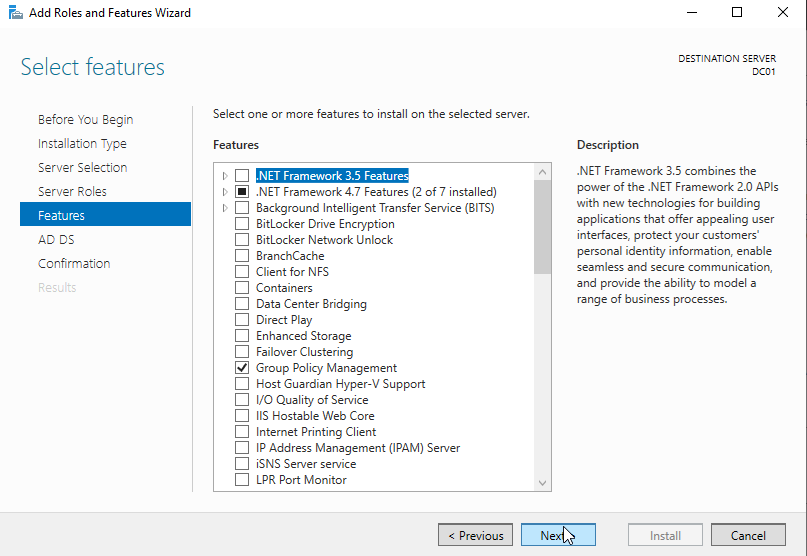 Figure 26. Feature selection for the server.
On the final screen, verify that the roles and features are the desired ones and click Install.
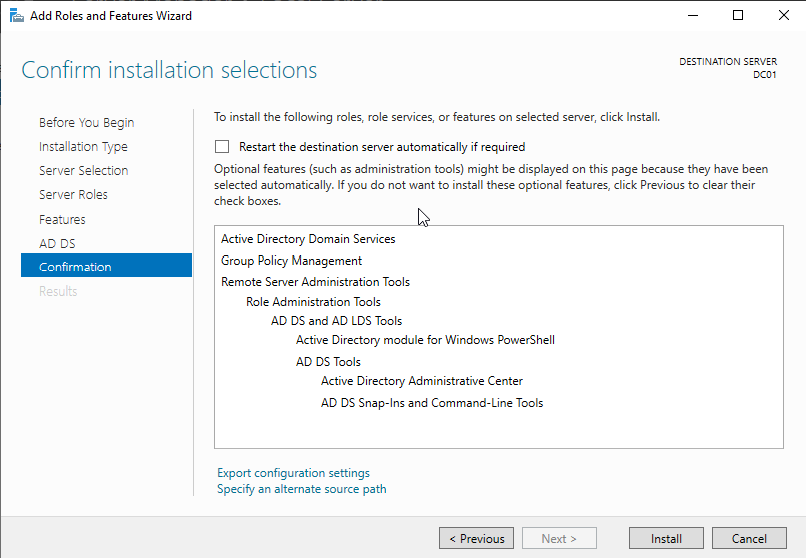 Figure 27. Completion of the Active Directory role installation.
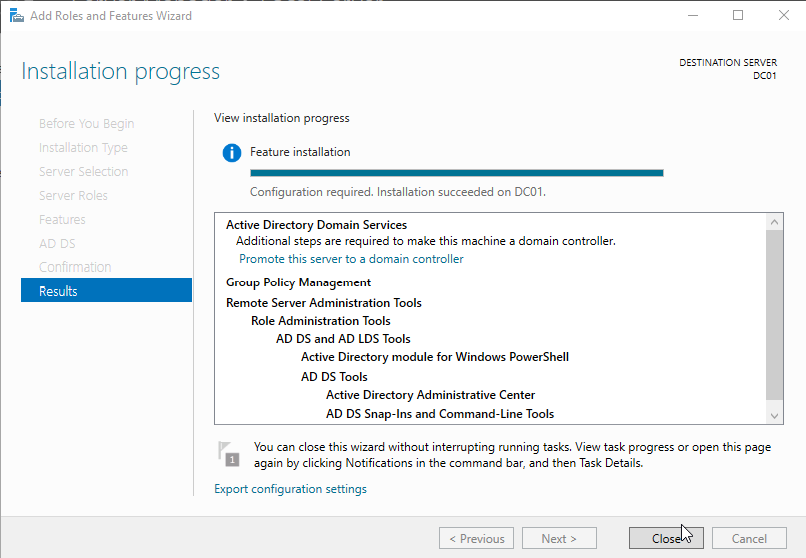 Figure 28. Completion of the Active Directory role installation.
Once the roles and features are installed, open the notifications panel and promote the server to domain controller.
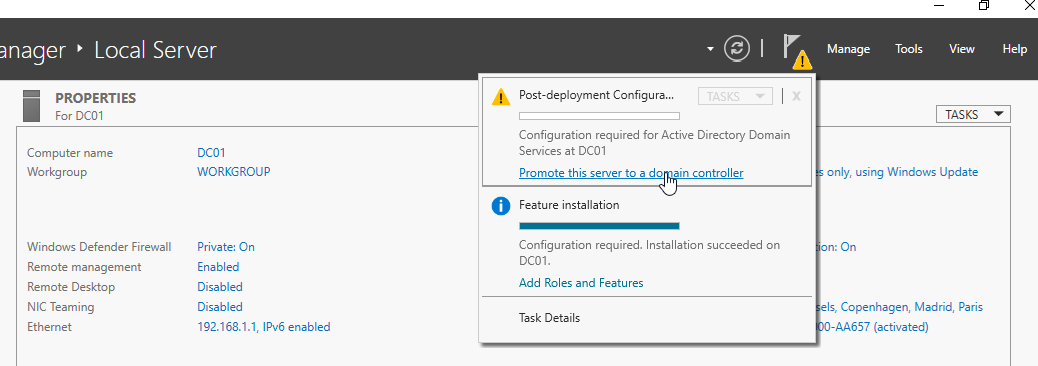 Figure 29. Promoting the server to domain controller.
Configuring the Domain Controller
In this section the CAPSULE.CORP domain is created and the DC01 server is promoted as its domain controller. In addition, several users are created using the “Active Directory Users and Computers” tool.
Following the previous steps, the following menu for creating a new domain is shown.
Check the options shown and name the new domain CAPSULE.CORP.
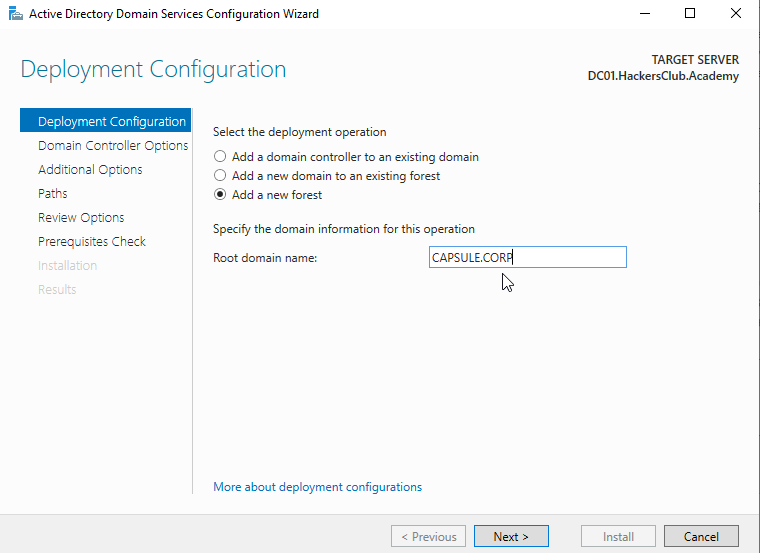 Figure 30. Creating the CAPSULE.CORP domain.
Set the recovery password.
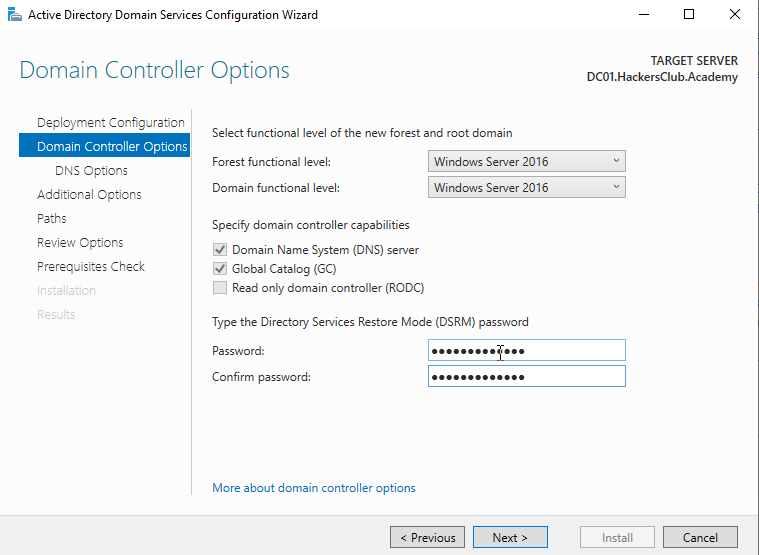 Figure 31. Setting the recovery password.
For the remaining options, click “Next” until reaching the final confirmation screen.
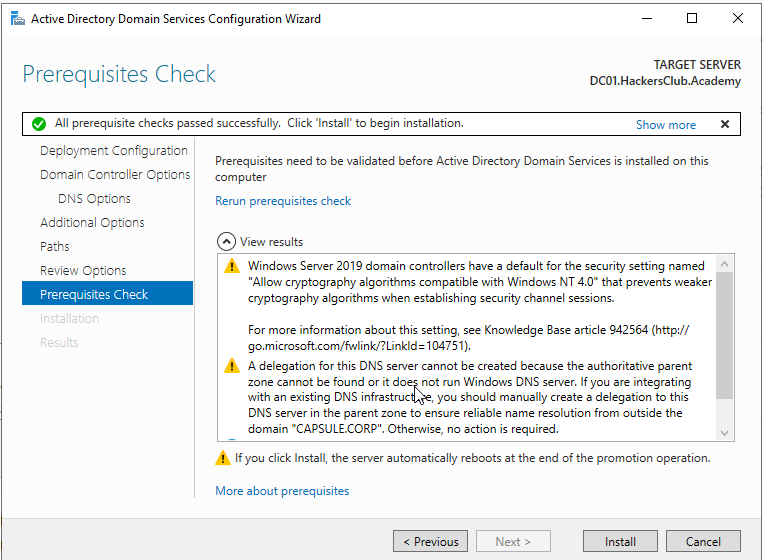 Figure 32. Final screen before the AD Services installation.
The following image shows that the DC01 server is now the domain controller of CAPSULE.CORP.
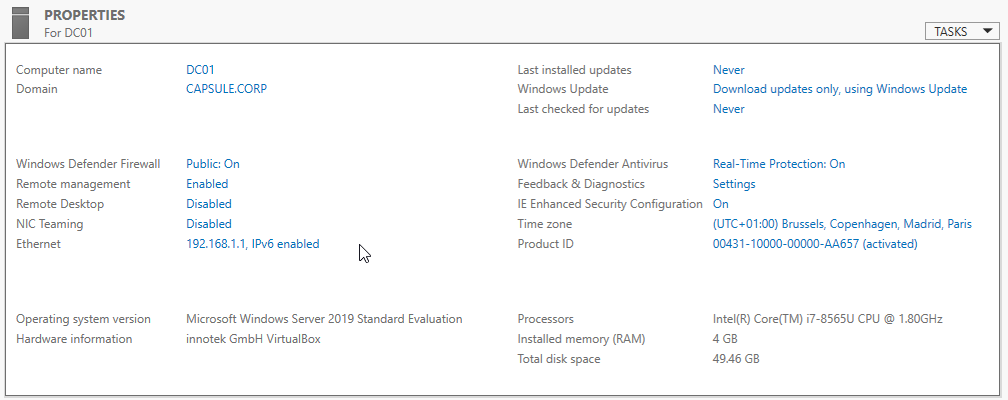 Figure 33. DC01 server dashboard as the domain controller of CAPSULE.CORP.
Creating users
To create the users Pepe, Carolina and CuentaDeServicio (service account), the “Active Directory Users and Computers” tool is used through the DC01 domain controller.
Inside the CAPSULE.CORP domain, right-click Users and go to “New” > “User”.
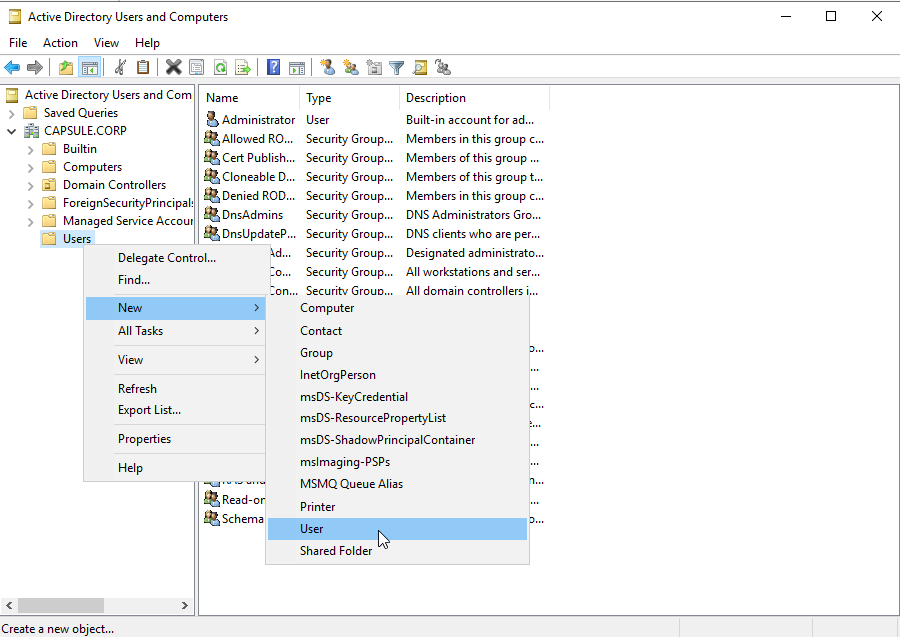 Figure 34. User creation using Active Directory Users and Computers.
Set the user’s name and logon.
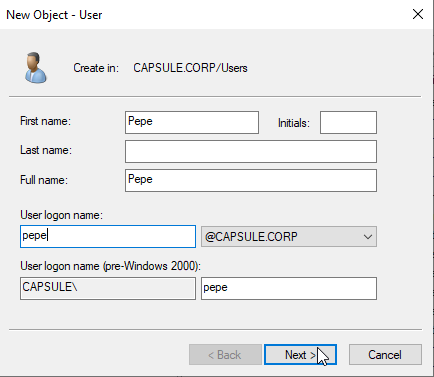 Figure 35. Setting the new user’s name and logon.
Set the password as indicated in the assignment and mark it so that it does not expire (which would be bad practice in a real environment).
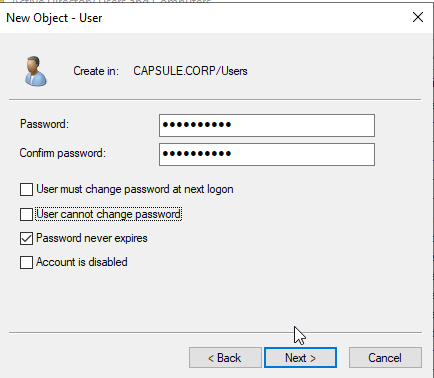 Figure 36. Setting the new user’s password.
Finally, finish the process and the user is created.
For the users Carolina and CuentaDeServicio the same process is repeated, adapting the data accordingly.
Joining users to the domain
To connect the Client to the CAPSULE.CORP domain, its DNS must first be set to the IP of the DC01 domain controller as follows.
Open the “Network & Internet Settings” configuration and click “Change adapter options”.
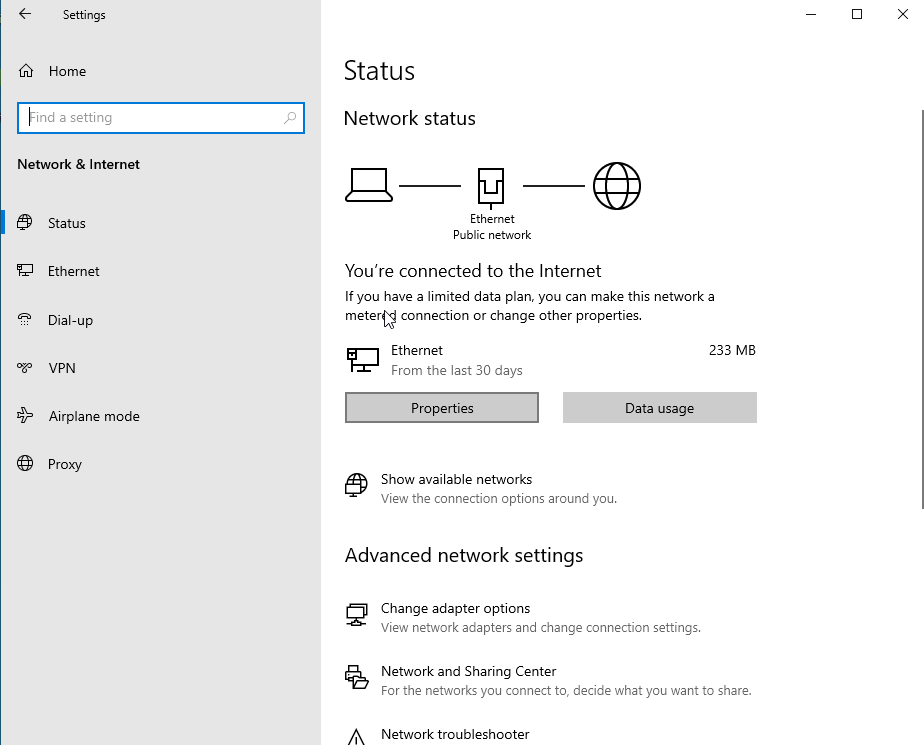 Figure 37. Windows 10 network configuration.
Once there, right-click the Ethernet network and select Properties.
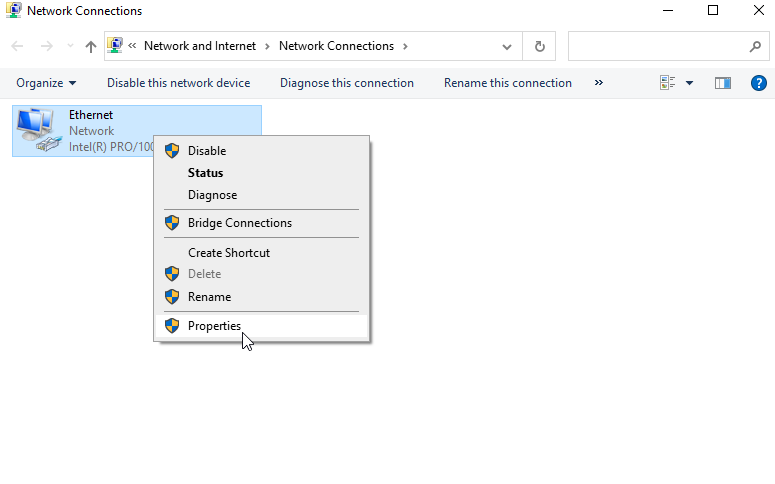 Figure 38. Ethernet network properties.
Select the IPv4/TCP option and, again, the “Properties” button.
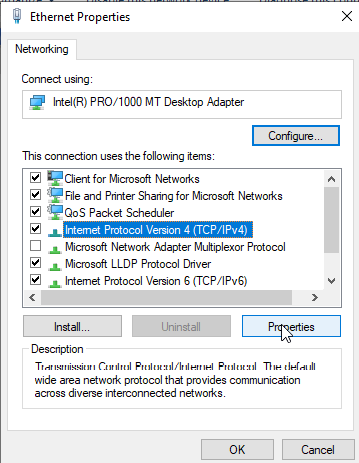 Figure 39. Ethernet IPv4 configuration.
Enter the domain controller’s IP address in the DNS server field and finish.
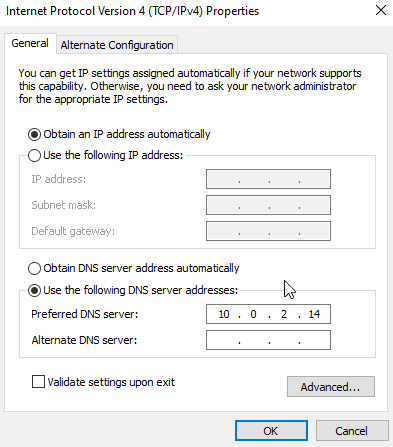 Figure 40. Setting the DNS server on the Client.
Once the Client’s DNS is configured, the next step is to join the machine to the CAPSULE.CORP domain. To do so, search for the “Access work or school” tool and follow the steps below.
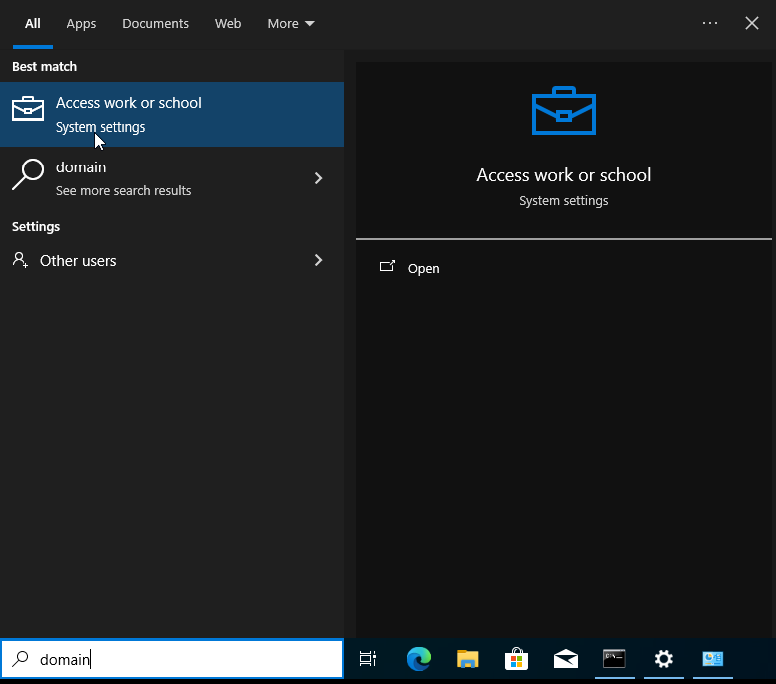 Figure 41. The “Access work or school” tool for adding machines to the domain.
Select the option to connect a new machine.
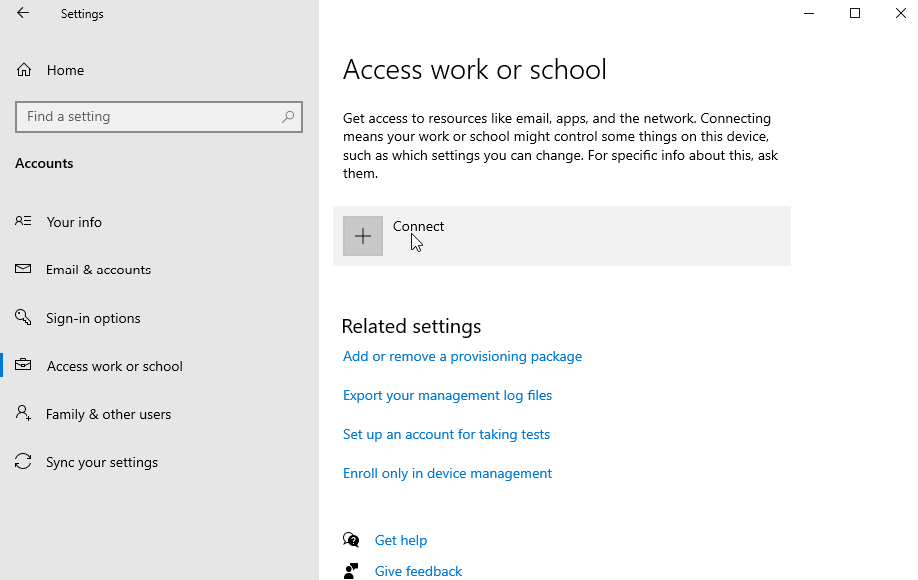 Figure 42. Connect a new machine.
Click on joining a local domain.
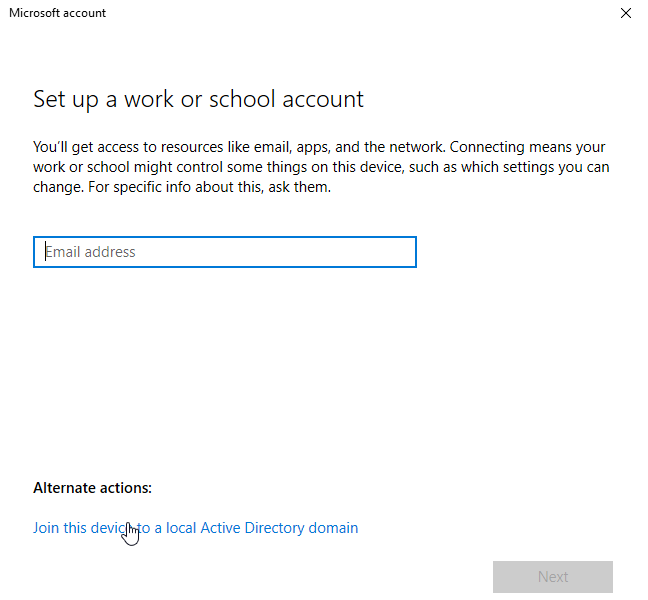 Figure 43. Join machine to a local domain option.
Set the domain name.
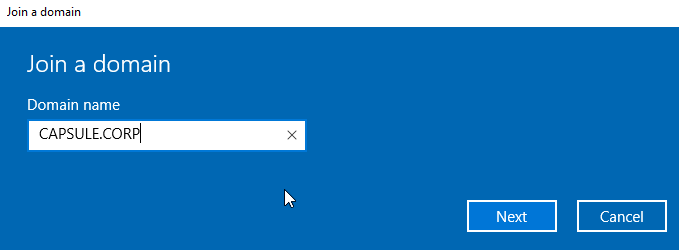 Figure 44. Join domain menu.
Enter the credentials of a domain user.
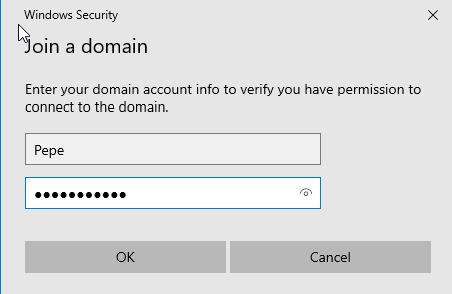 Figure 45. Domain authentication menu.
Finally, restart the machine for the changes to take effect.
Domain logons
To verify that the environment has been configured correctly and that the Client has successfully joined the domain, the following shows successful logons for the DC01 server administrator and for the Client machine using Pepe’s credentials.
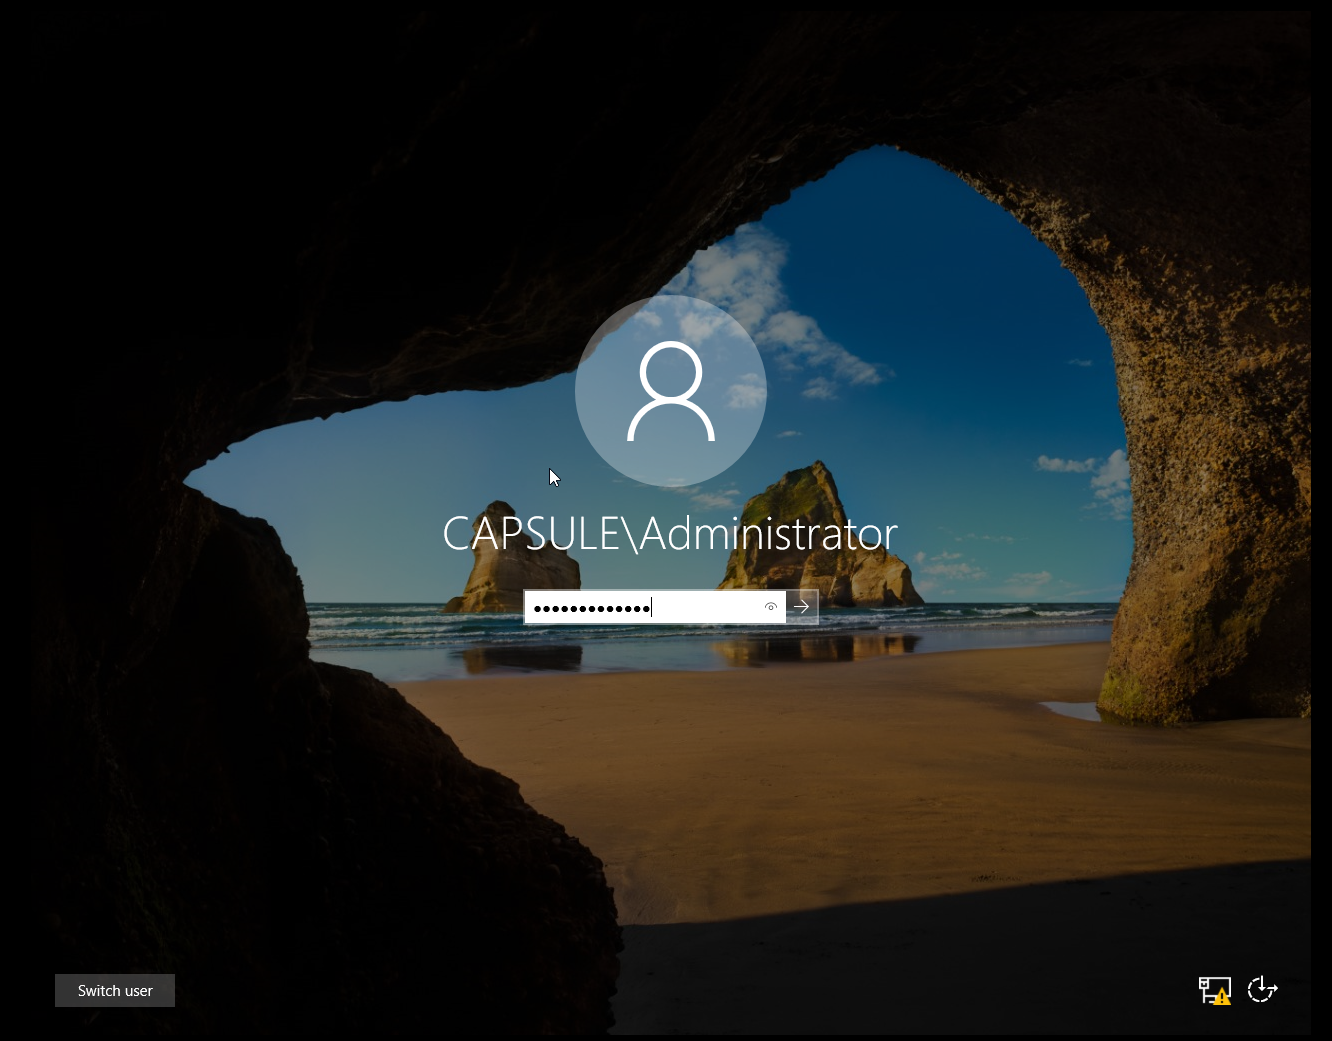 Figure 46. Administrator logon on the DC01 server.
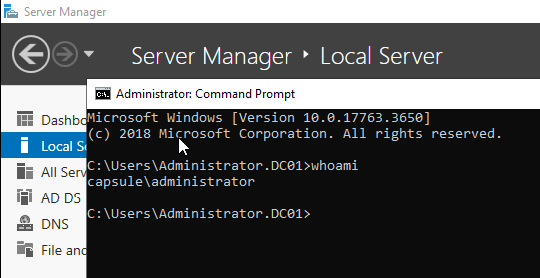 Figure 47. Administrator logon on the DC01 server.
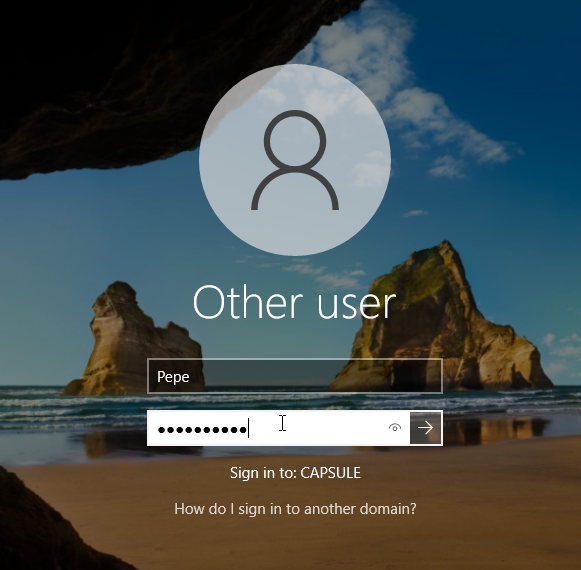 Figure 48. Client logon to the domain using Pepe’s credentials.
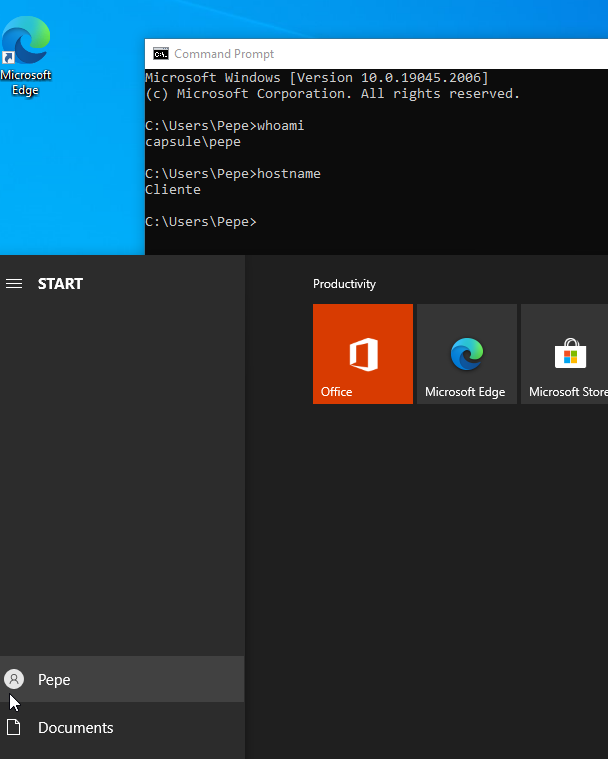 Figure 49. Client logon to the domain using Pepe’s credentials.
Configuring objects
In this section, several objects of the CAPSULE.CORP domain are created and modified. This is where weak configurations are intentionally added, to be exploited in upcoming installments:
- Creation of a group named “AdminSistemas”.
- Creation of a GPO named “GPOTest”.
- Pepe
- Joined to the “AdminSistemas” group.
- Add the “Do not require Kerberos preauthentication” property.
- Carolina
- Joined to the “Domain Admins” group.
- Add the text “Mi contraseña es Patatas123” (“My password is Patatas123”) to the description.
- CuentaDeServicio
- Add the value “kerberoastable/service” to the “servicePrincipalName” attribute.
Images of the creation and modification process and the final results of the listed items are shown below.
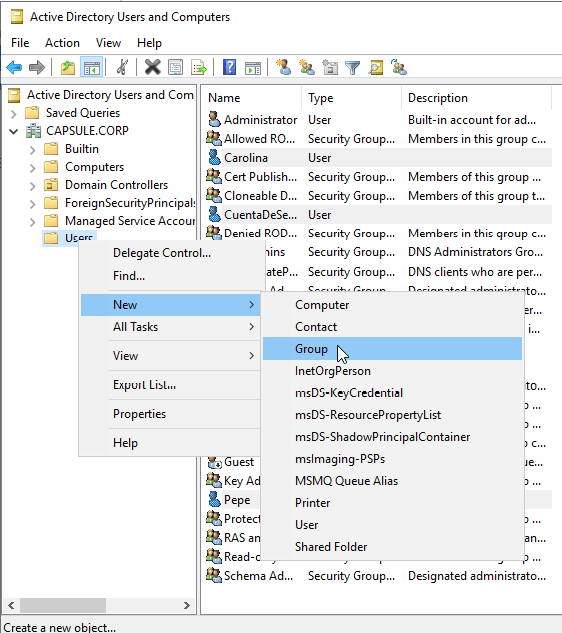 Figure 50. Creating a new group.
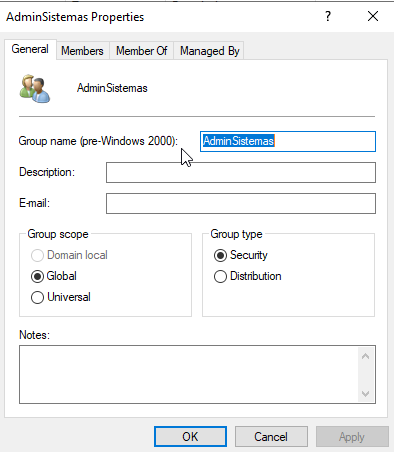 Figure 51. Properties of the new AdminSistemas group.
A new GPO is created using the Windows Server “Group Policy Management” tool.
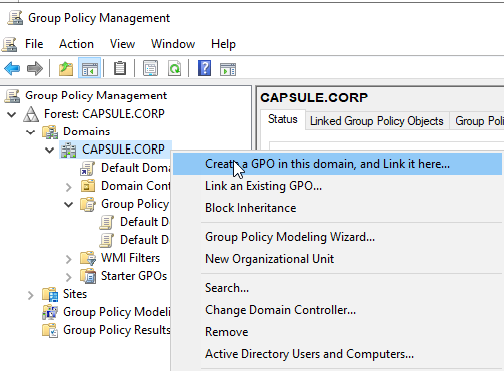 Figure 52. Creating a new GPO for the domain.
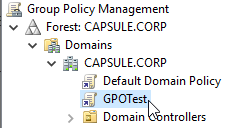 Figure 53. New GPO named GPOTest created.
The user Pepe is joined to the AdminSistemas group through the “Members” menu of the AdminSistemas group properties, using the “Active Directory Users and Computers” tool.
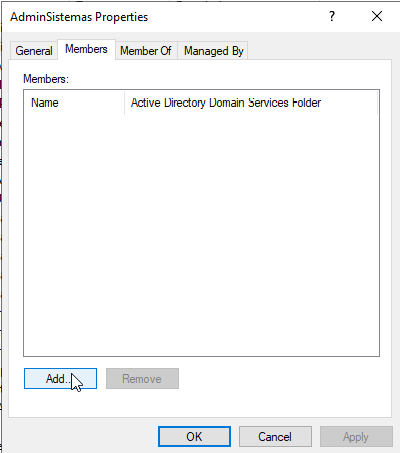 Figure 54. Joining a user to the AdminSistemas group (1).
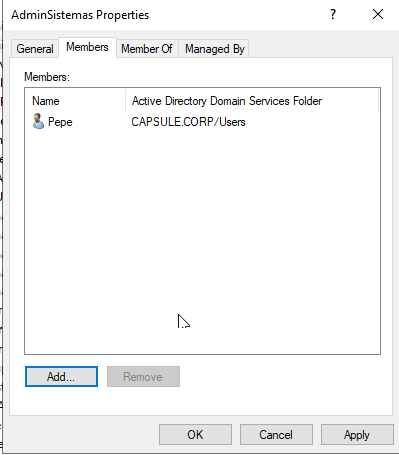 Figure 55. Joining a user to the AdminSistemas group (2).
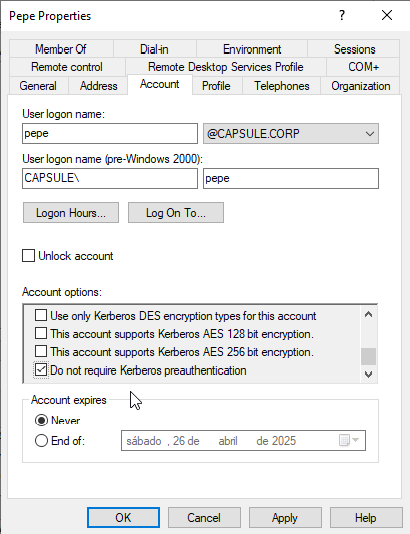 Figure 56. Modifying the “Do not require Kerberos preauthentication” option for Pepe.
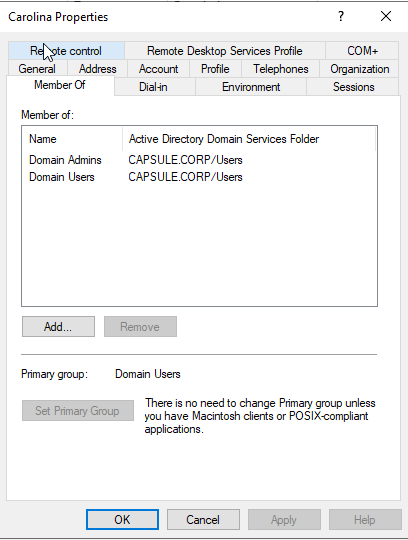 Figure 57. Joining Carolina to the “Domain Admins” group.
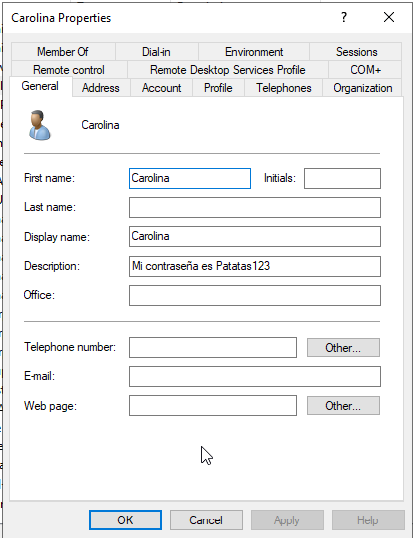 Figure 58. Carolina’s description text.
Next, to modify the “servicePrincipalName” attribute for CuentaDeServicio, the advanced view must first be enabled in order to see an object’s attributes tab.
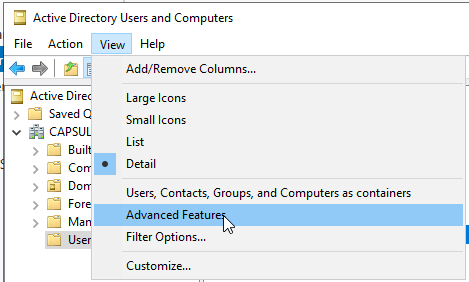 Figure 59. Enabling the advanced view in Active Directory Users and Computers.
There, the modified property can be seen.
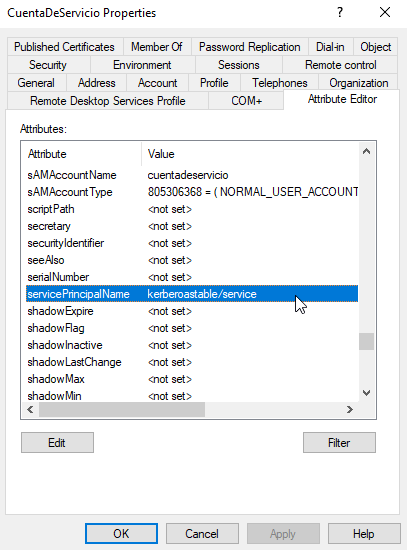 Figure 60. Modified servicePrincipalName property for CuentaDeServicio.
Conclusion
In this first installment, a fully functional Active Directory lab has been built from scratch. Starting from three virtual machines in VirtualBox —a Windows Server 2019 (DC01), a Windows 10 Enterprise (Client) and a Kali Linux (attacker)— the whole path has been covered: renaming and fixing the server’s network settings, deploying the Active Directory Domain Services role, promoting DC01 as the controller of the CAPSULE.CORP domain, creating the users Pepe, Carolina and CuentaDeServicio, joining the client machine to the domain and verifying that everything works with a first successful logon.
Finally, the playing field has been deliberately prepared by adding weak configurations —each of them representing a real attack vector— that will be dissected in the coming chapters:
- Firewall disabled on all machines: removes a layer of defense and telemetry, making reconnaissance and exploitation easier.
- Pepe with “Do not require Kerberos preauthentication“: enables the AS-REP Roasting attack, which allows obtaining material encrypted with the user’s password without authenticating, to then crack it offline.
- CuentaDeServicio with a servicePrincipalName (SPN): opens the door to Kerberoasting, where any authenticated user can request a service ticket and attack the service account’s password offline.
- Carolina in Domain Admins with her password written in the description field: combines a highly privileged account with a credential leak that is trivial to enumerate. The description attribute is readable by any domain user.
- Passwords that never expire: indefinitely extend the exploitation window of a compromised credential.
Lessons and security measures
Although this environment is intentionally insecure, every weakness has its defensive counterpart. When managing a real Active Directory, these are the measures that should be applied:
- Keep the firewall enabled and properly segmented; do not give up the visibility and traffic control it provides.
- Do not disable Kerberos preauthentication unless there is a very specific and justified technical need. Periodically audit accounts with the
DONT_REQ_PREAUTHflag. - Minimize and protect SPNs. Use group Managed Service Accounts (gMSA) with long, automatically rotated passwords; this way Kerberoasting stops being profitable.
- Never store secrets in readable attributes such as description or info. Credentials belong in a secrets manager, not in the directory.
- Apply the principle of least privilege: review who belongs to Domain Admins and reduce that group to the bare minimum.
- Enforce strong password policies with expiration, and enable MFA wherever possible.
- Monitor and log authentication events and Kerberos requests to detect anomalous behavior in time.
With the lab up and running and the pieces in place on the board, it is time to take action. In Part 2 the series starts with the enumeration of users and resources with PowerShell, the first step of any well-executed intrusion. See you in the next installment!